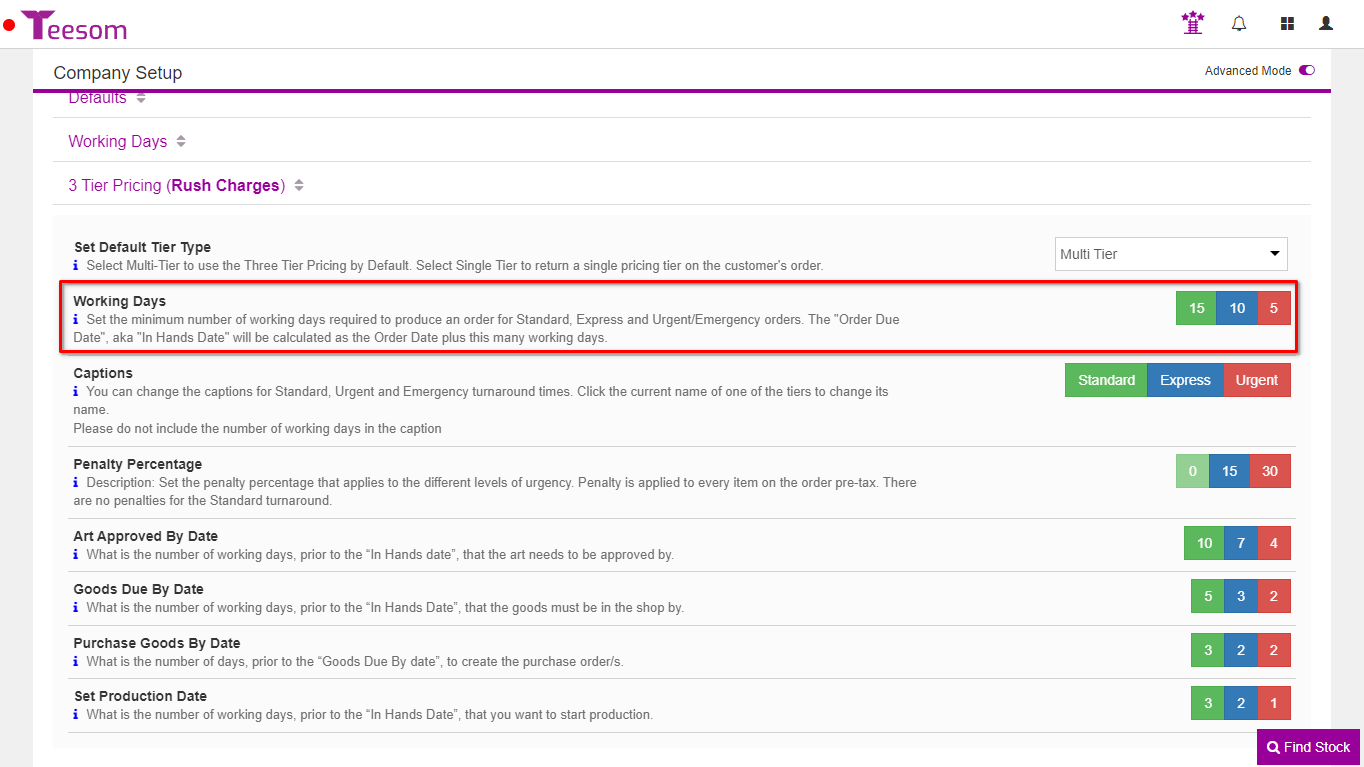
You will configure a default number of production days for each of the Tiers, which in turn will determine the “Due Date” for the order as XX days from the date the quote is accepted and converted to an Invoice.
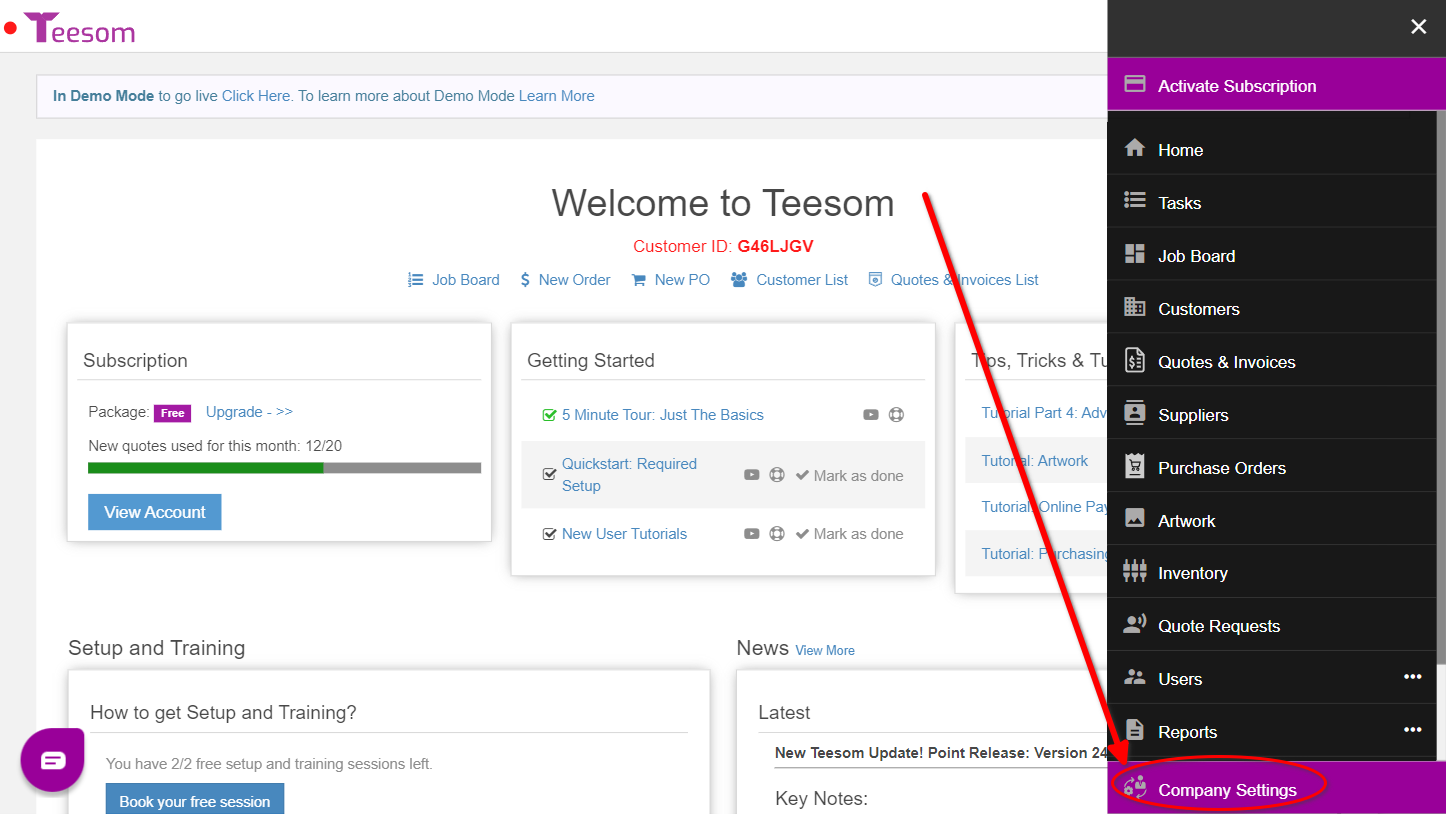
Go to the “Main Menu”
Select “Company Settings“
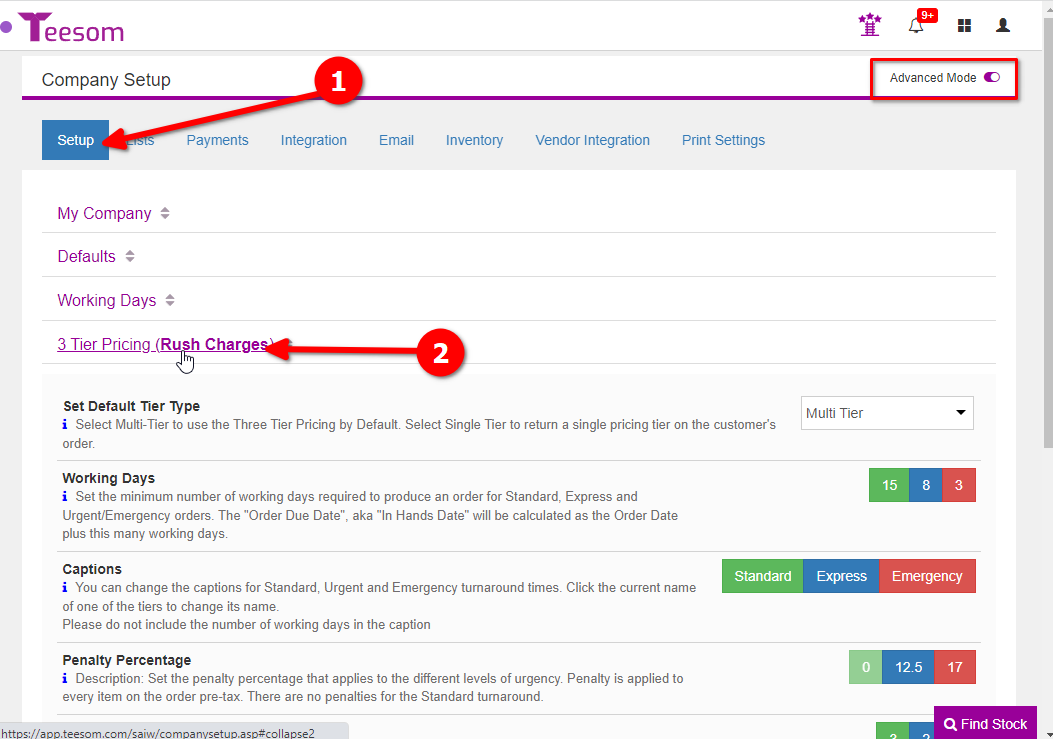
Under the ‘Setup’ Tab expand “3-Tier Pricing (Rush Charges)”
To see the 3 Tier Pricing option toggle "Advanced Mode" On.
To adjust the number of working days required to produce the order for each tier option click on the relevant colored box. The “Order Due Date” aka the “In Hands Date” will be set to be XX working days after the quote is converted to an invoice.
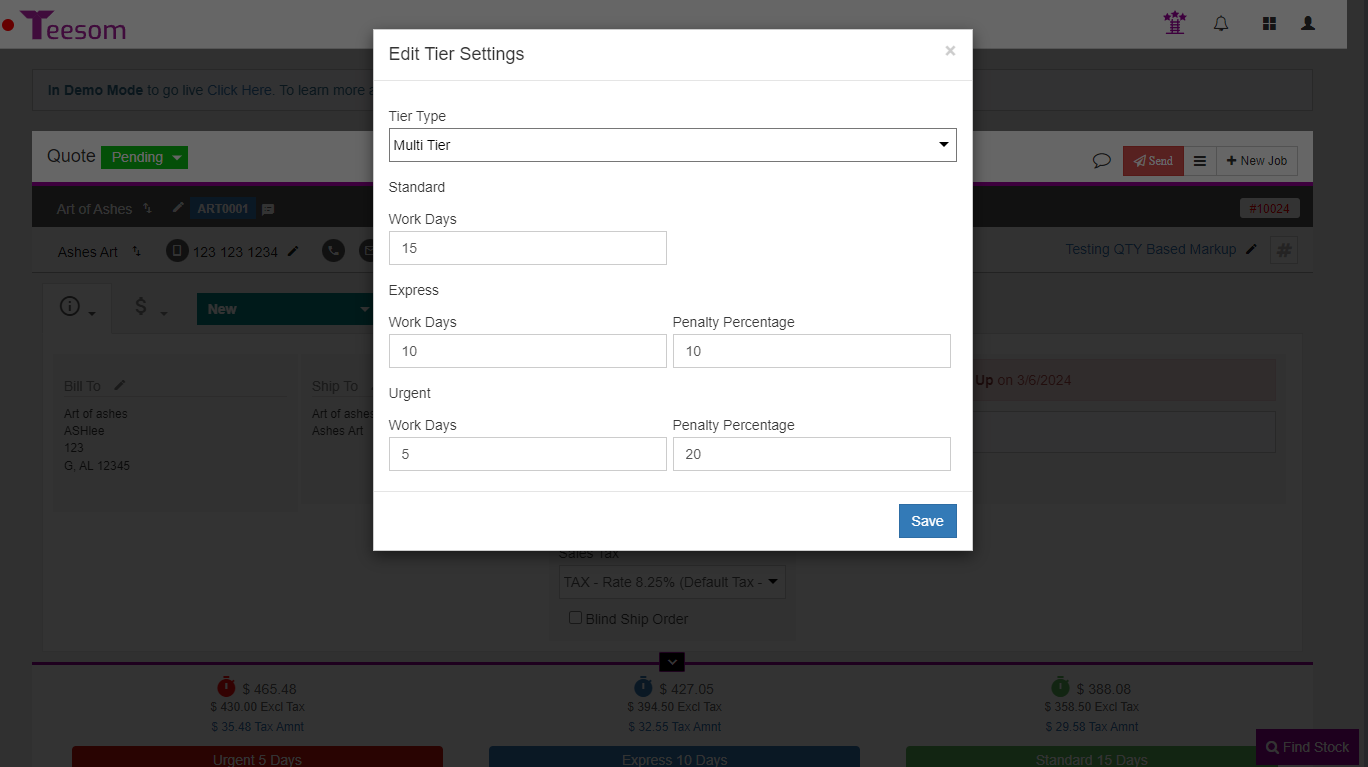
Example: In the image below a standard order would be allocated a total of 15 working/production days to be completed.
The 'Working Days' you enter here determines how long the order takes from start to finish.
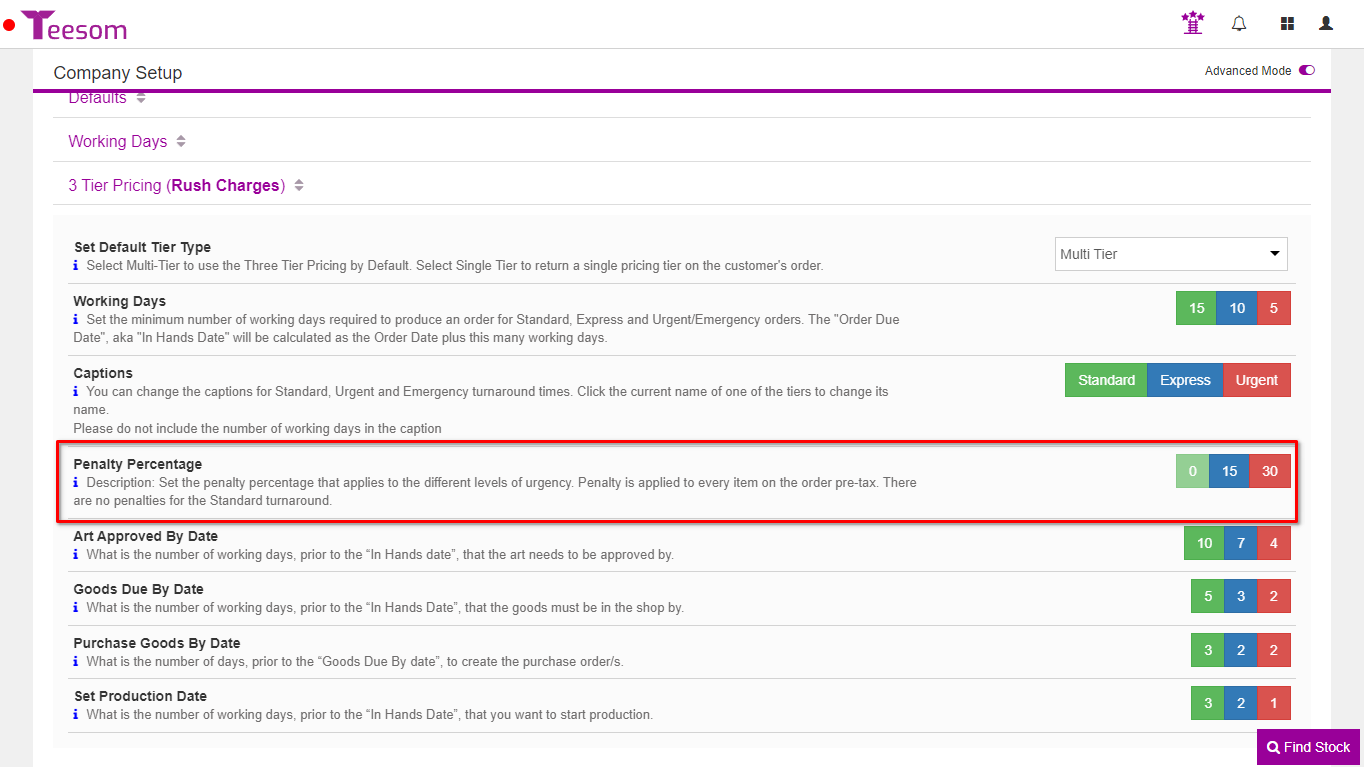
To adjust the percentage penalty/charge for each tier click on the relevant box. The “Standard” tier has a set turnaround of 0 you can only adjust the percentage of the “Express” and “Urgent” tiers.
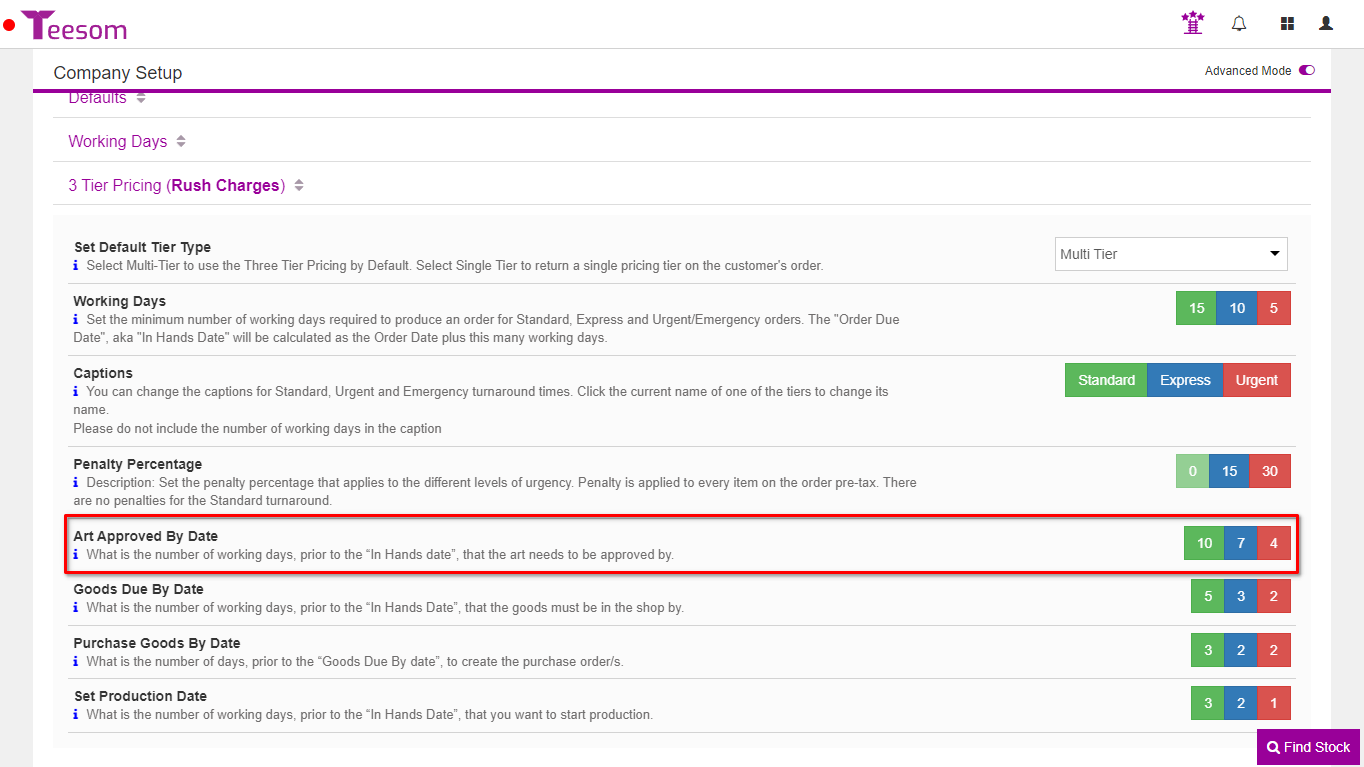
The “Art Approved By Date” will determine when the customer needs to approve any artwork associated with the order by. This date sets the number of days prior to the “In Hands Date” the art needs to be approved by.
Example: In the image below, a standard order would indicate the art should be approved 10 days prior to the order due date / “In Hands Date”. The amount of days available for the customer to approve art for a standard order is 5.
You can calculate how many days, after order confirmation, are given to approve the artwork by taking the total working days and subtracting the art approved by days:
Standard pricing: 15 days – 10 days = 5 days after order confirmation the artwork needs to be approved.
Express pricing: 10 days – 7 days = 3 days after order confirmation the artwork needs to be approved.
Urgent pricing: 5 days – 4 days = 1 day after order confirmation the artwork needs to be approved.
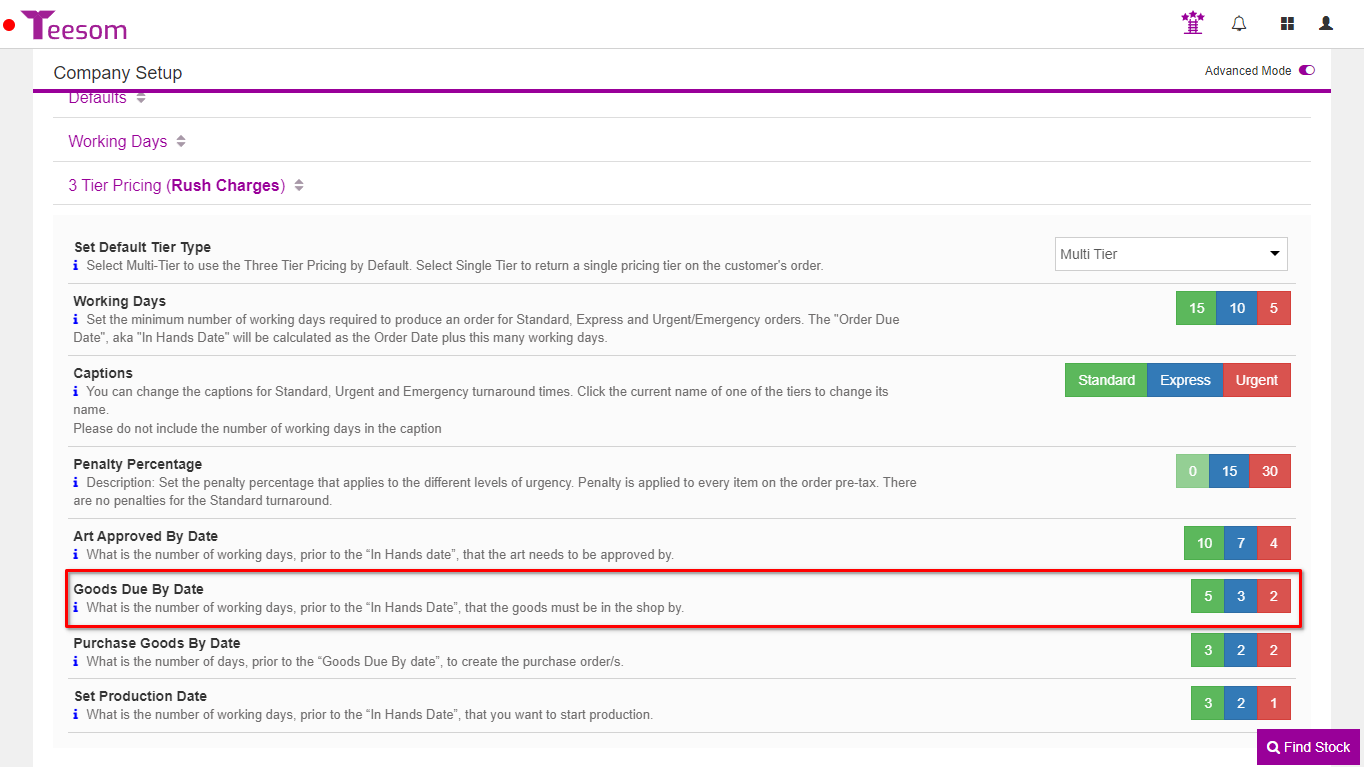
The “Goods Due By Date” will set when you need to have the goods in your shop. This date sets the number of daysprior to the “In Hands Date” the goods needs to be in.
Example: In the image below a Standard order will require the goods to be in 5 days prior to the “In Hands Date”. This means that you will have a total of 10 days to receive the goods.
You can calculate how many days, after order confirmation, are given to get the goods by taking the total working days and subtracting the goods due by days:
Standard Pricing: 15 days – 5 days = 10 days after order confirmation you need to have received the goods.
Express Pricing: 10 days – 3 days = 7 days after order confirmation you need to have received the goods.
Urgent Pricing: 5 days – 2 days = 3 days after order confirmation you need to have received the goods.
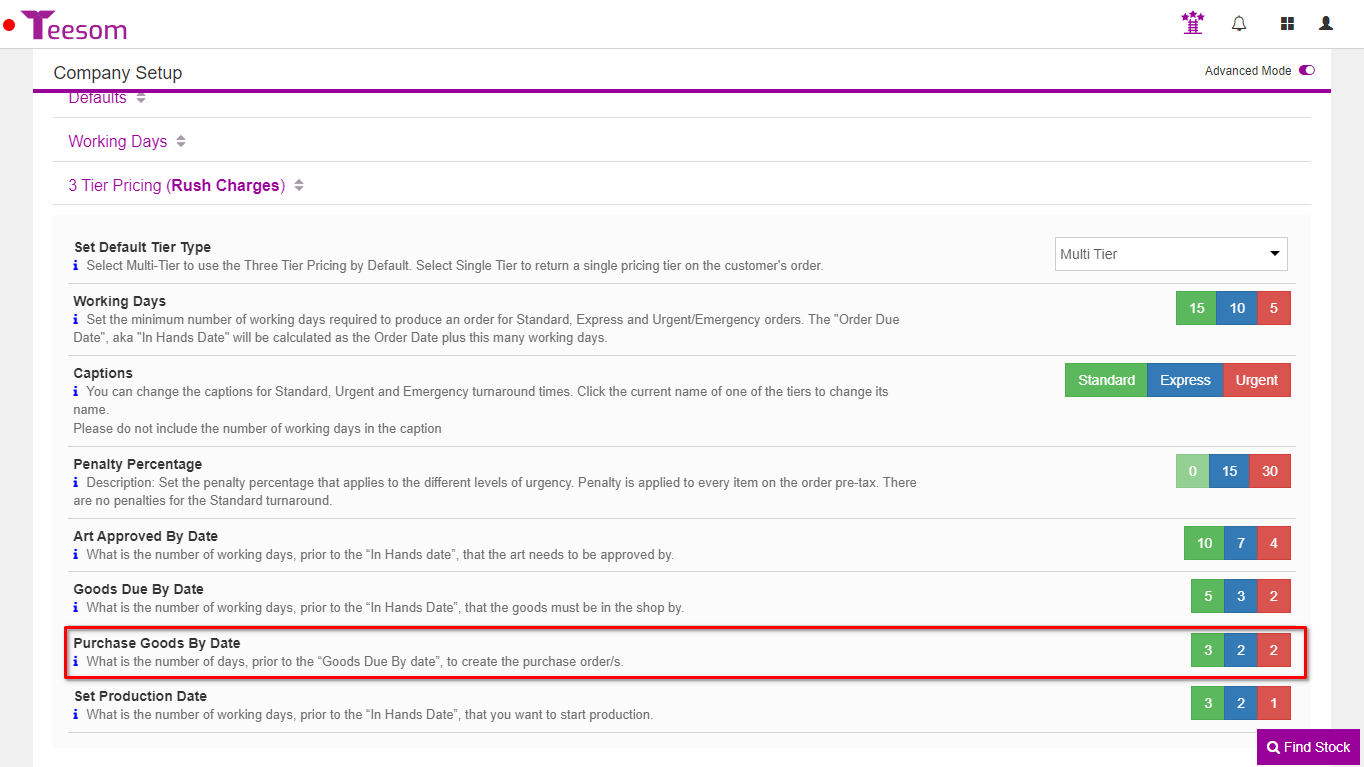
The “Purchase Goods By Date” determines when the purchase order needs to be made by. Be aware that this date is based off of the “Goods Due By Date” and not the “In Hands Date” like the other dates.
Example: In the image below a standard order would require the purchase order be created 3 days prior to the “Goods Due By Date”. This means you would have a total of 7 days to send the PO.
You can calculate how many days, after order confirmation, are given to create the PO by taking the total working days and subtracting the goods due by days and then subtracting the purchase goods by days:
Standard Pricing: 15 days – 5 days = 10 days – 3 days = 7 days after order confirmation the Purchase Order needs to be sent to the Vendor/Supplier.
Express Pricing: 10 days – 3 days = 7 days – 2 days = 5 days after order confirmation the Purchase Order needs to be sent to the Vendor/Supplier.
Urgent Pricing: 5 days – 2 days = 3 days – 2 days = 1 day after order confirmation the Purchase Order needs to be sent to the Vendor/Supplier.
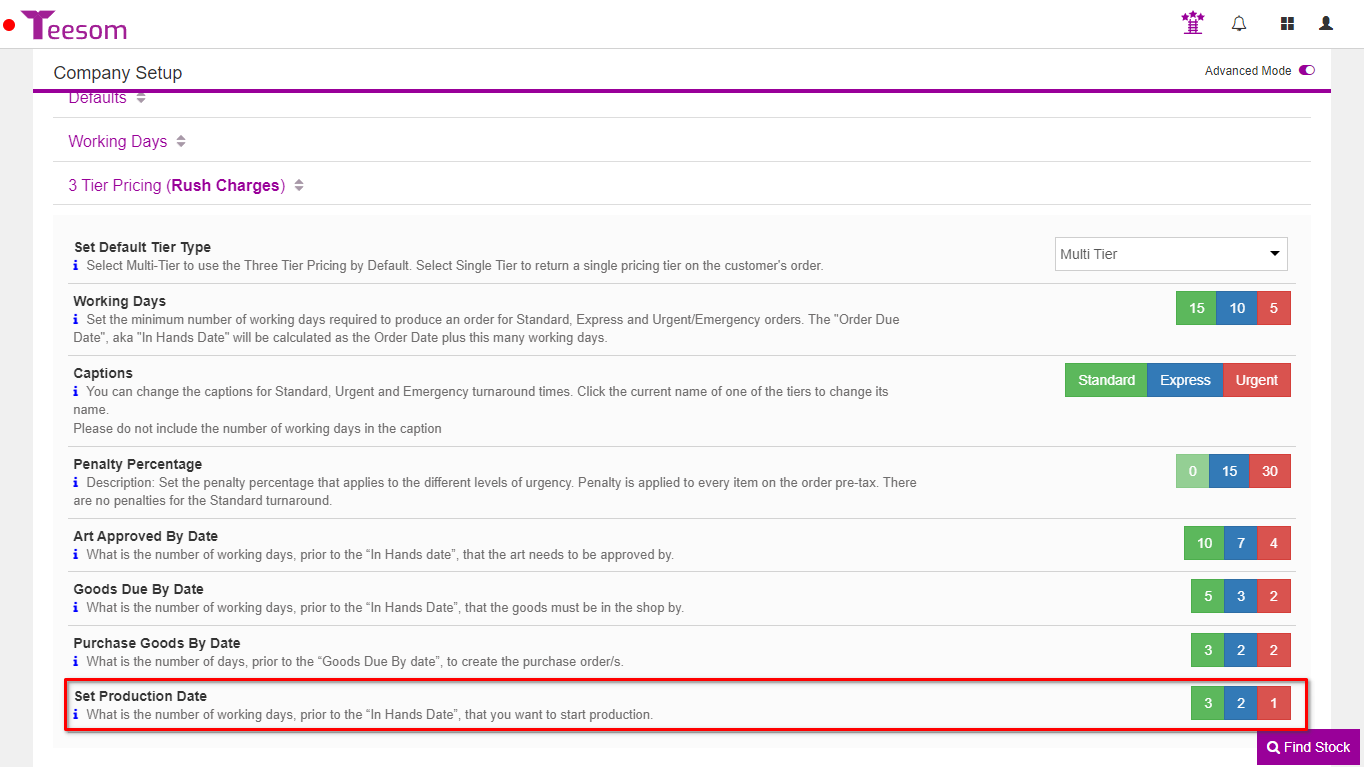
The “Set Production Date” determines when production needs to be run for this order. This date sets the number of daysprior to the “In Hands Date” that production must be run for the order.
Example: In the image below a standard order would set the production to be run 3 days before the “In Hands Date”. Therefore you have 12 days before production is due to start.
You can calculate how many days, after order confirmation, are given before starting production by taking the total working days and subtracting the Set Production days:
Standard Pricing: 15 days – 3 days = 12 days after order confirmation production should start.
Express Pricing: 10 days – 2 days = 8 days after order confirmation production should start.
Urgent Pricing: 5 days – 1 day = 4 days after order confirmation production should start.
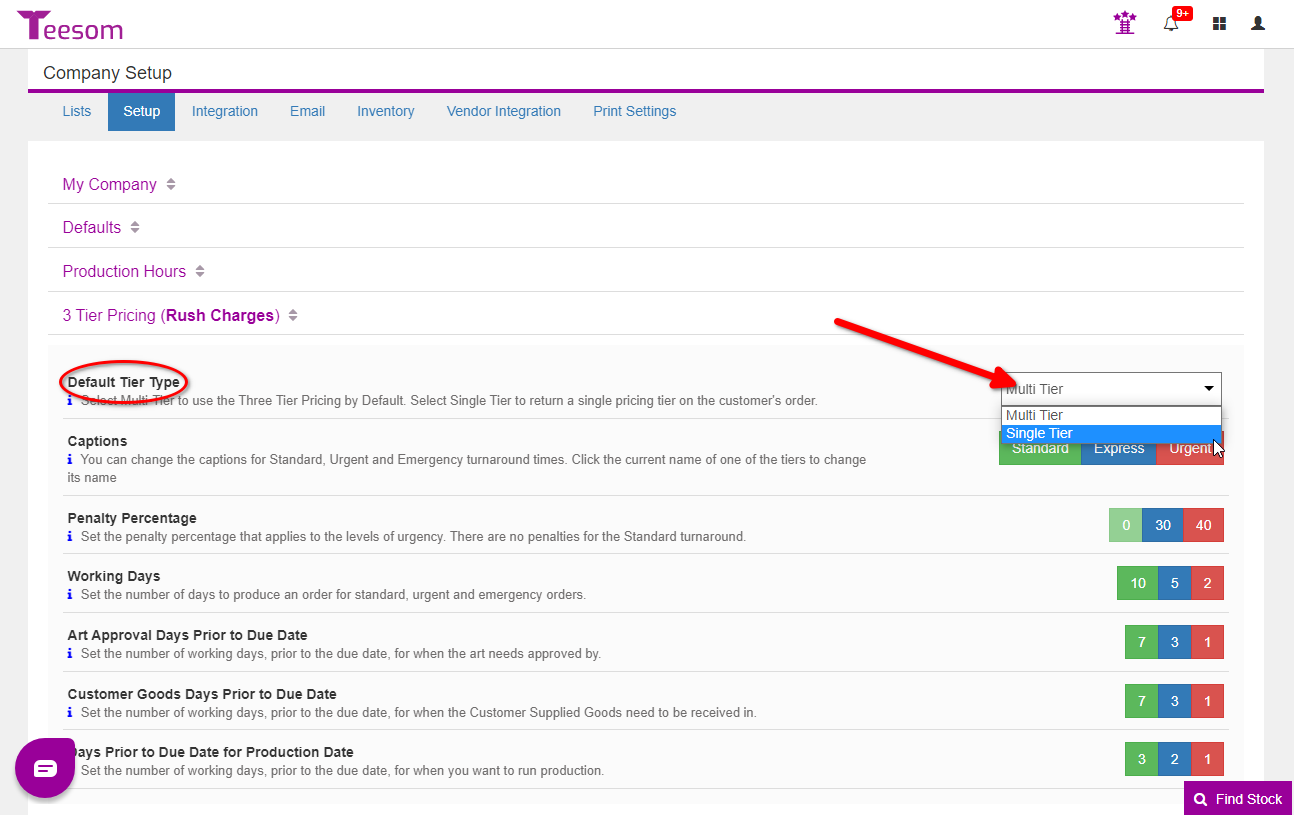
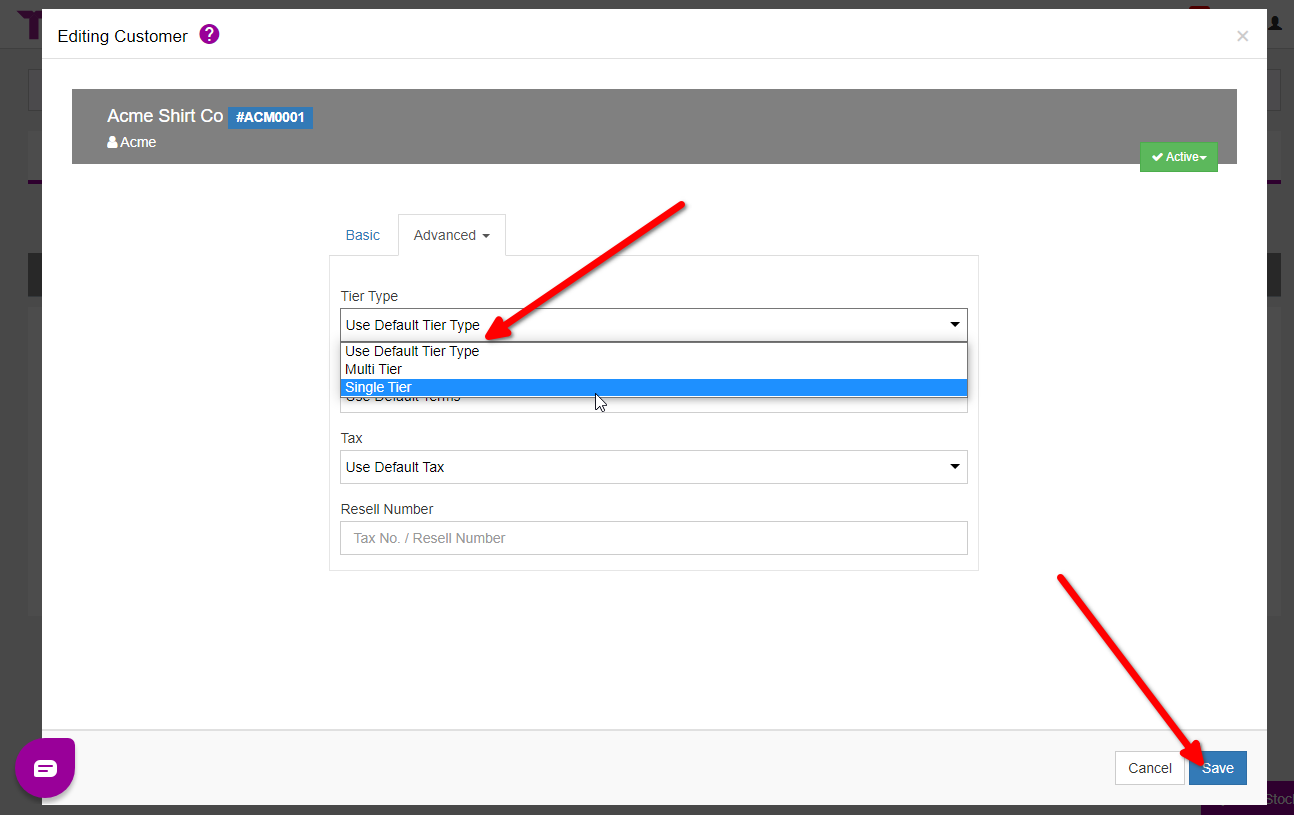
There is also the option to set the company-wide default tier type.
The options are “Multi Tier” pricing or “Single Tier”.
Multi Tier: Gives your customer the option to choose between the three different tiers
Single Tier: Customer will be given only one pricing option.
NOTE: If you set the default to "Single Tier" Teesom will use the "Standard" tier by default. You can easily switch to "Express" or "Urgent" from the "Edit Tier Settings" section at the bottom of the quote.
Change the Pricing Tier on a Quotation
On the QUOTE you can change the Tier Type for that order on-the-fly. For example if you need to make it a RUSH ORDER.
Click on “Edit Tier Settings” at the very bottom to:
Adjust the “Tier Type” available to the customer. (Either Multi or Single.)
Change the working days needed to complete this order at each tier.
Change the penalty percentage to be charged at each tier. (Standard is always 0.)
If you have Multi-Tier enabled for the order, the Customer will be allowed to SELECT which price (and time frame for completion) they want for that order!
You can only change the Tier settings on a QUOTE. Once the customer has accepted the Quote and it is converted to a WIP/Invoice, you can no longer change the Pricing Tier.
On the customer view of the quote your customer will be able to change the tier pricing on the order, provided you have “Multi-tier Pricing” selected.
You can tell which tier of pricing is being used by the color of the retail price box:
Set A Customer's Default Tier-Type
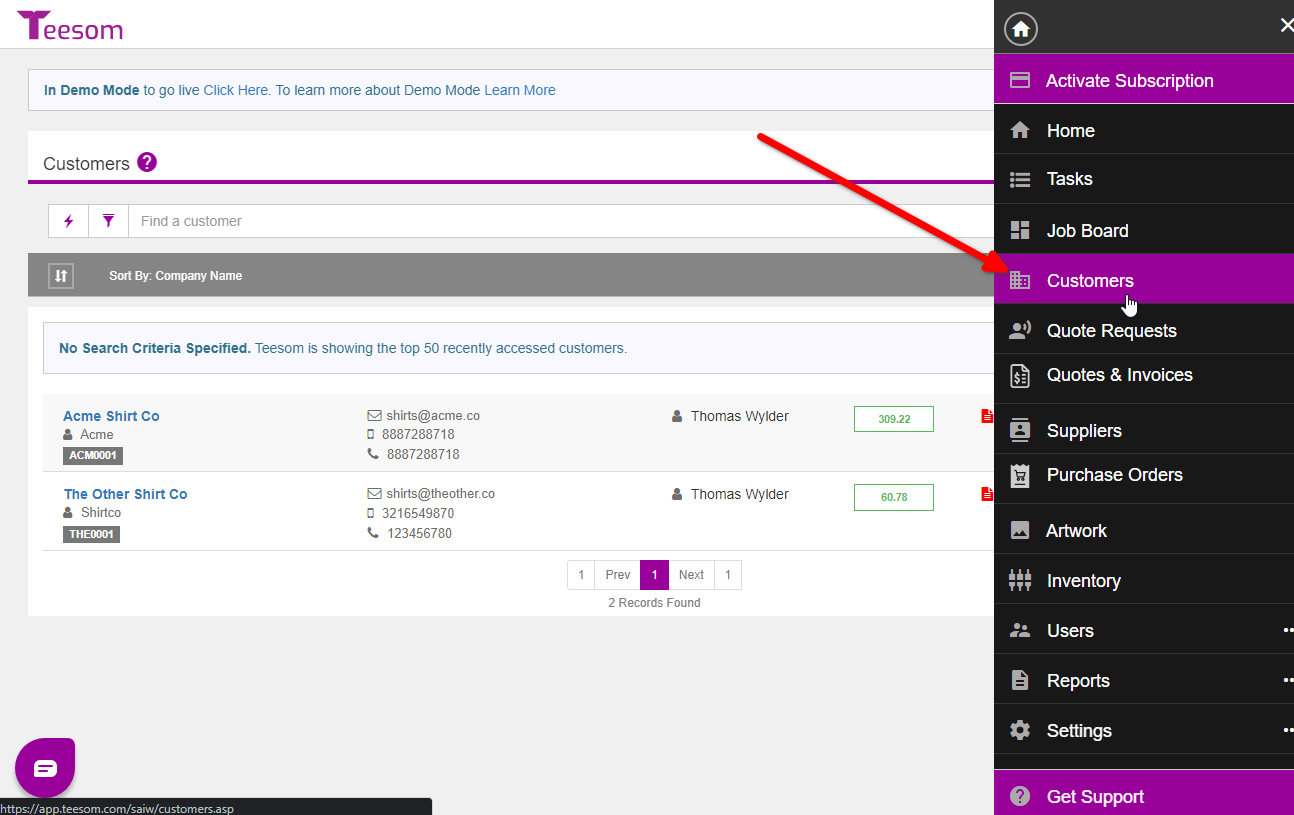
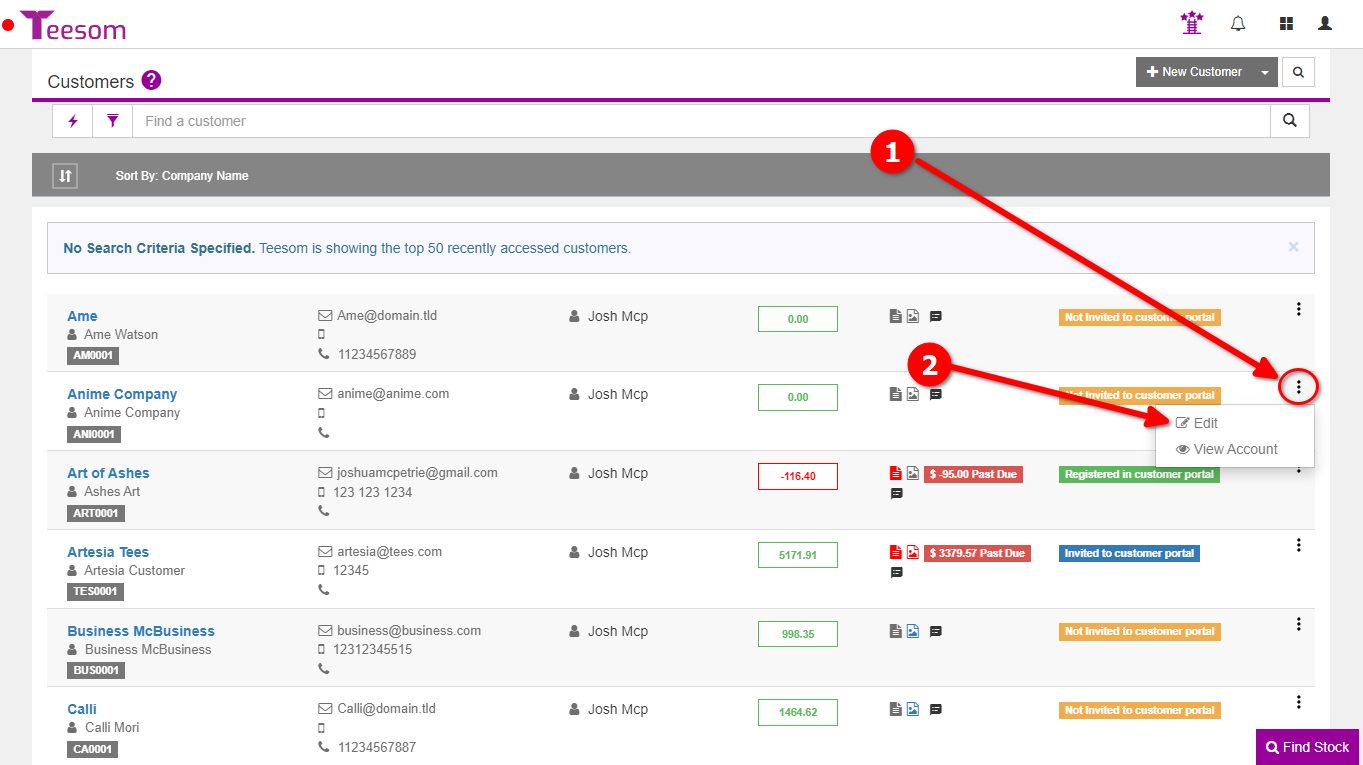
You can adjust the default for specific customers on the ‘Customers’ page.
From the “Main Menu” go to “Customers“:
On the “Customers” screen click on the “3 Dot” menu then select ‘Edit‘:
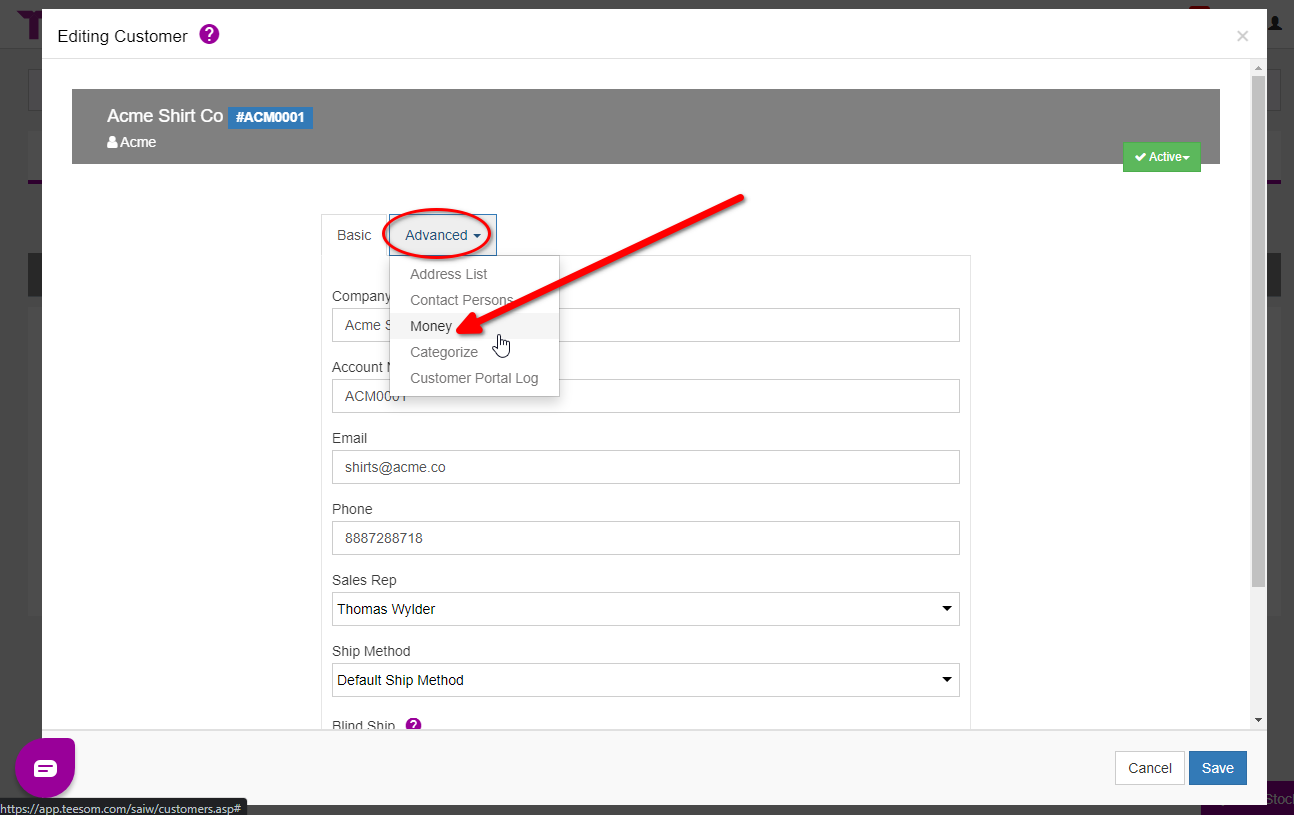
Then click on the “Advanced” dropdown, select “Money”, and then choose the default tier-type for that customer.
When you are done click “Save“
NOTE: You can also do this from the Quotation, simply click on the Customer Name at the top of the Quotation to open the Customer Edit screen.