An Embroidery “stitch count break” price matrix is used for more advanced embroidery pricing using both stitch count breaks and quantity breaks.
In this article we will go over creating a stitch count break price matrix and show an example of it in use on an order.
How Embroidery Stitch Count Break Pricing Works
Stitch Count Breaks
First you will specify a stitch-count break, then you will set a rate to be charged for any stitch-count that falls within that break. If you have ‘Rate Per Thousand’ off it will be a flat rate, if it is on then the value entered will be charged per 1000 stitches on the order.
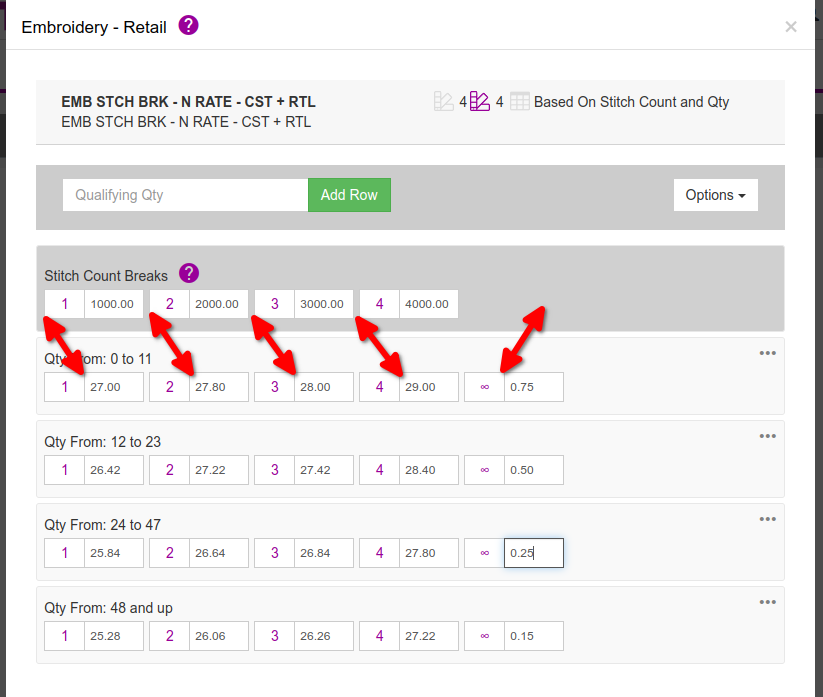
Using the screen shot below as an example: (Rate per thousand is off.)
The first stitch-count break of 1000 will charge $27 for any stitch-count between 0 and 1000.
The second stitch count break will charge 27.80 for any stitch-count between 1001-2000.
and so on …
If the stitch-count is higher than the last break, Teesom will switch to using a "Rate per thousand" which is applied to the entire stitch count.
Quantity Breaks
The way “Quantity Breaks” work is, depending on the quantity of “Imprints’ on the order it will use the relevant row.
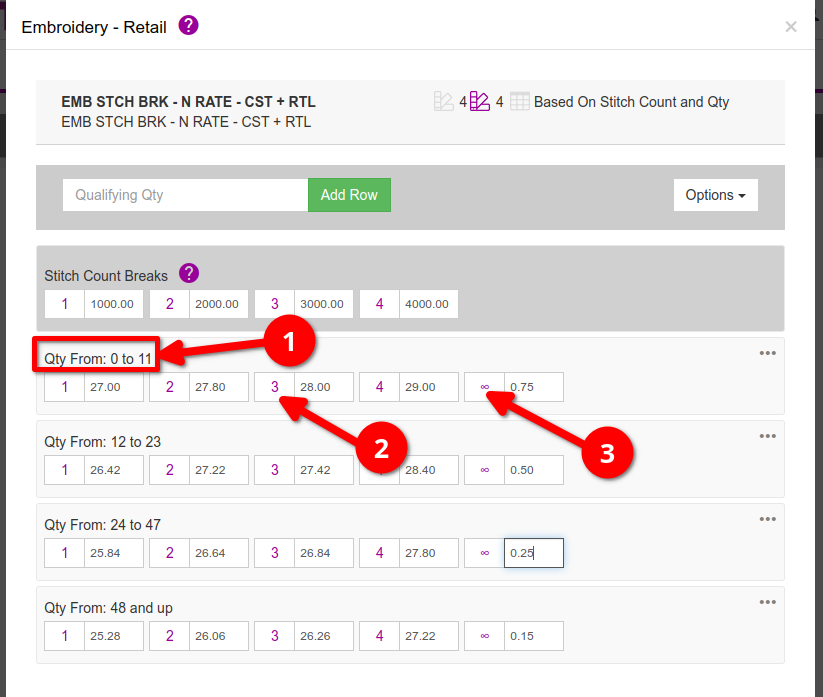
Using the screenshot below as an example:
The first “Quantity Break” row is 0-11 so if your “Imprints” count on an order is between 0-11 then Teesom will use the prices set in this row.
Within that quantity break this is the “third” stitch-count break. It determines which flat rate will be charged ($28 in this example), depending on the number of stitches in the design (between 2001 and 3000 in this example), at an order quantity of between 0 and 11.
IMPORTANT:
If the stitch-count is higher than the last break, Teesom will switch to using a “Rate per thousand” which is applied to the entire stitch count.
Summary
In summary of how “Stitch Count” and “Quantity” breaks work together in a “Stitch Count Break” price matrix is:
The stitch count determines what price column will be used.
The quantity count determines which price row will be used.
Create a Stitch Count Break Price Matrix
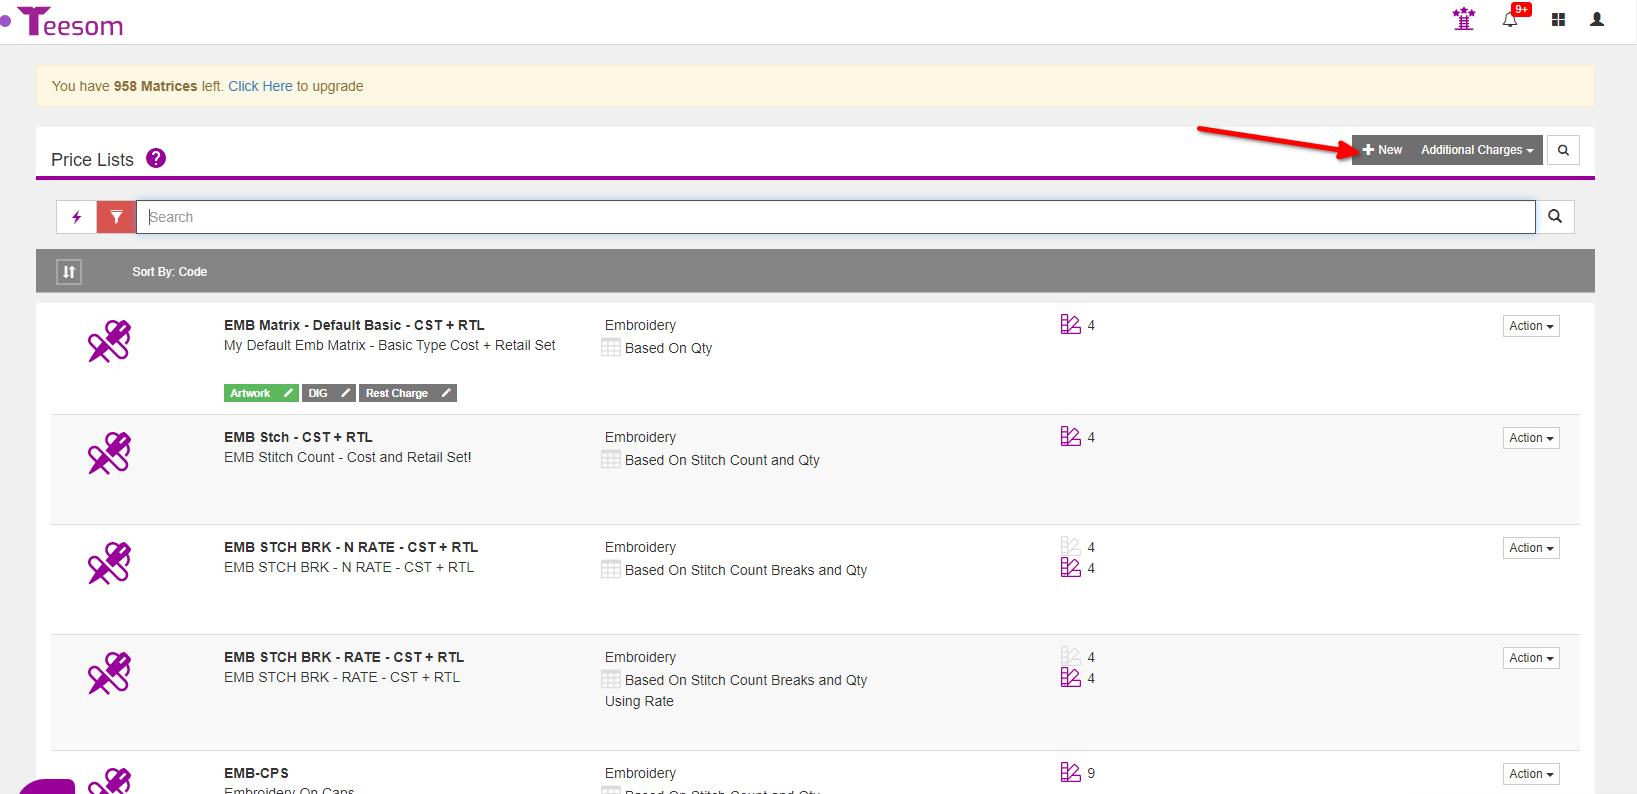
To create a Stitch Count Break Price Matrix:
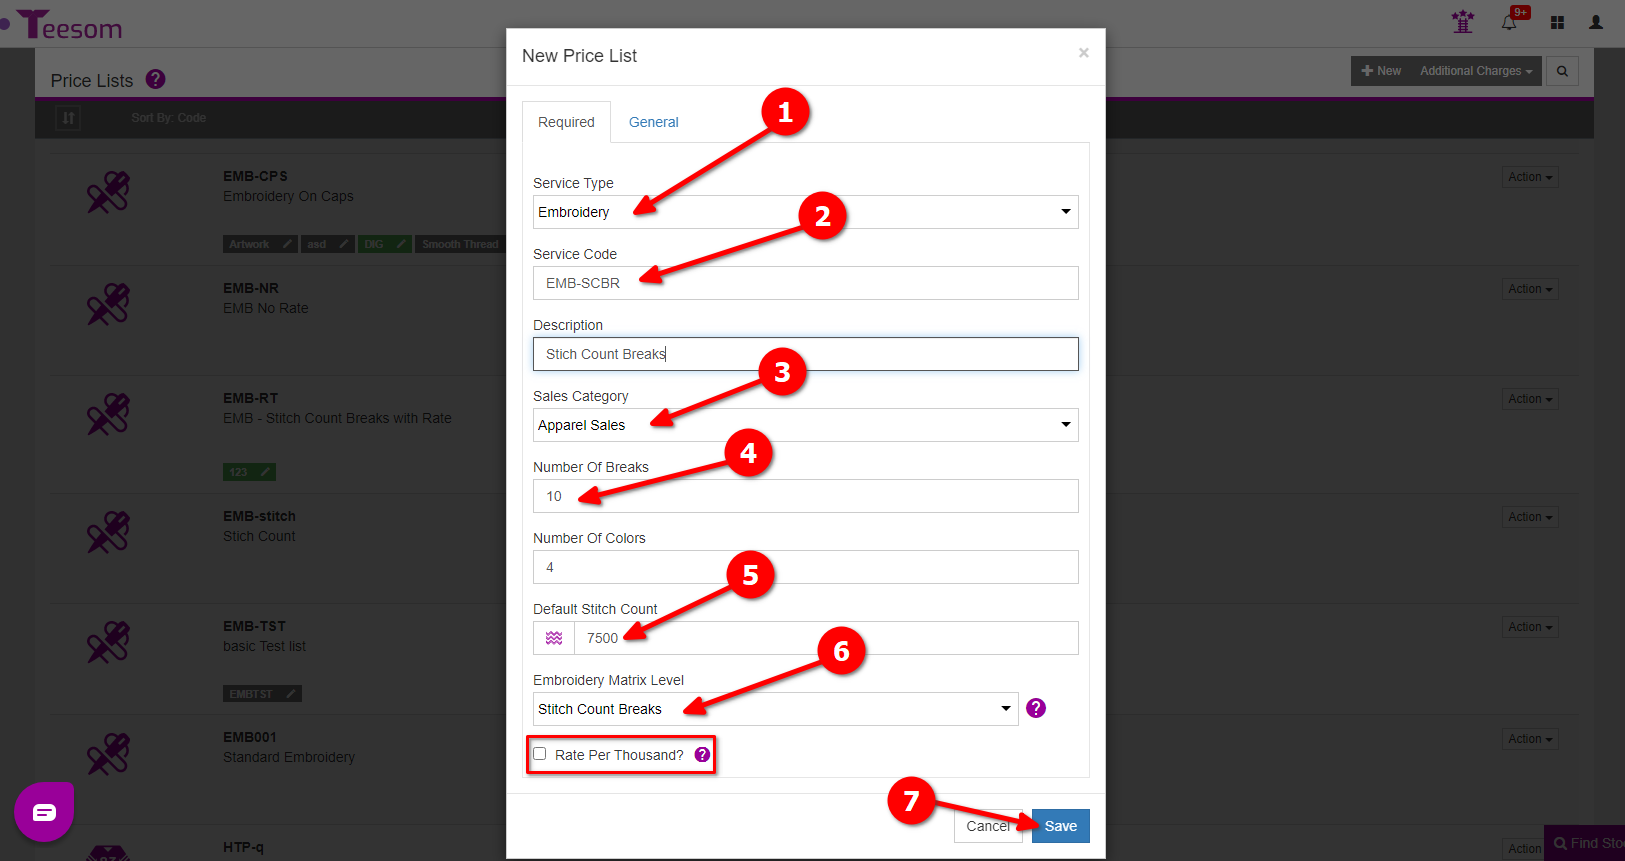
Click on ” + New“
Set the service type as embroidery.
Enter a service code.
Select the sales category.
Enter the amount of stitch count breaks you want.
Enter the default stitch count.
Set the matrix level to “Stitch Count Breaks”.
Click “Save“.
Note: If the Rate per thousand option is checked, all header columns will have a rate per thousand. If the Rate per thousand is unchecked, an additional column will appear with the "∞" symbol. This is for stitch counts that go over your final header stitch count.
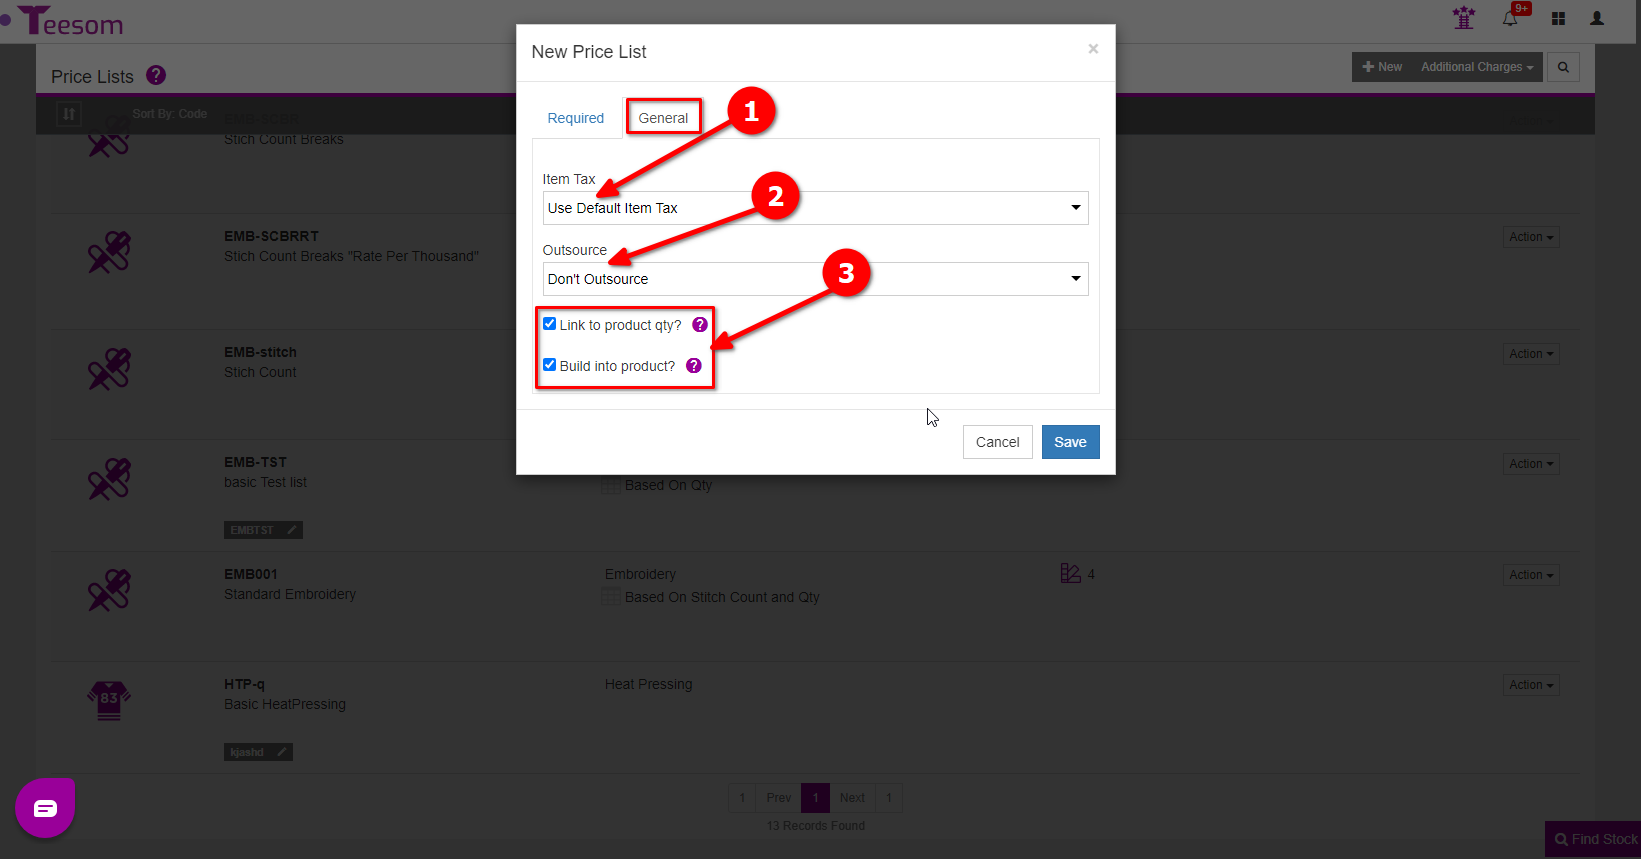
On the general tab you can:
Set the Tax.
Choose to outsource the imprint or not.
If you check the box “Link To Product Qty” then the number of imprints will be determined by the total qty of products on the order.
If you check the box “Build Into Product“, whenever you add the imprint onto the order it will automatically build the price into the product rows.
Click on Save to create the new item.
Next we will create the “Cost” and “Retail” price matrices.
Create A Cost Matrix
You only have to create a cost price table if you outsource your imprints.
A cost matrix is used when you outsource your imprints to a third-party.
A “stitch-count” cost matrix uses stitch count breaks along with set quantity breaks.
We will go over how to create one below.
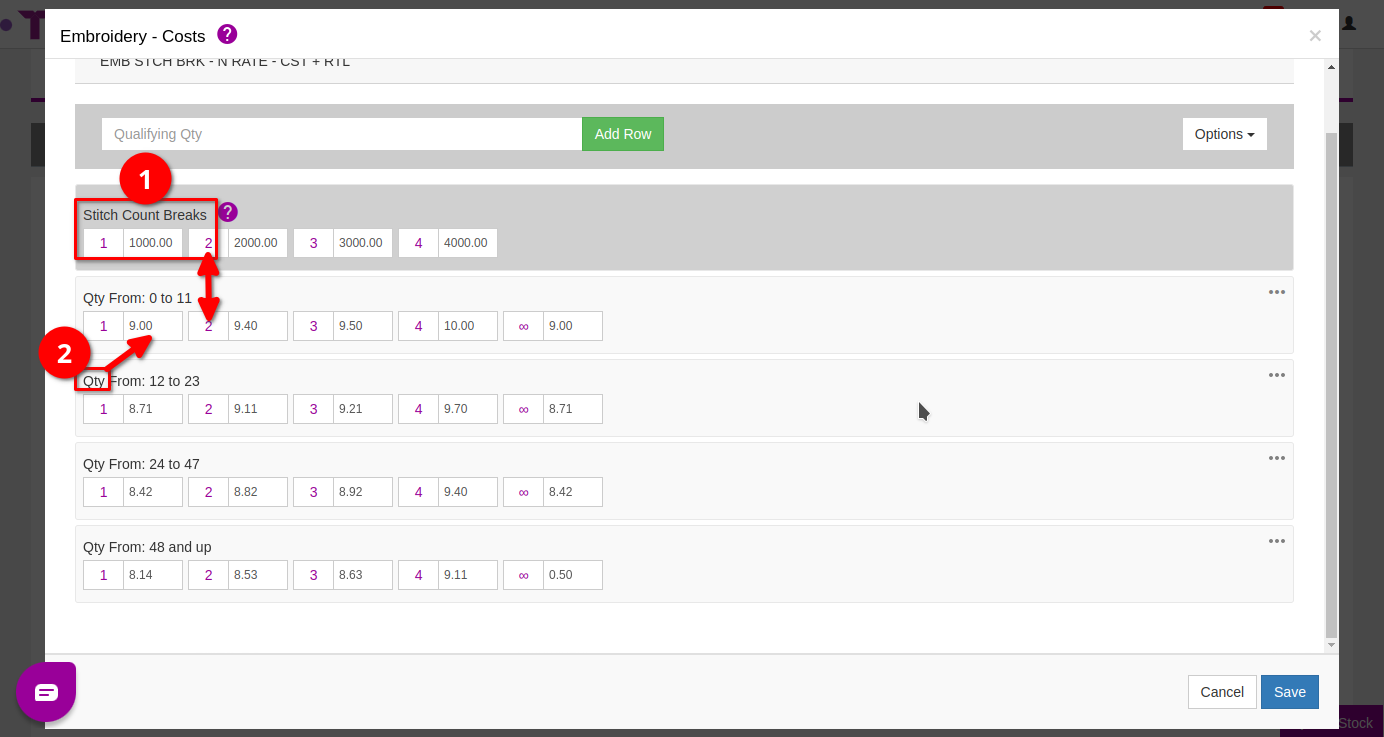
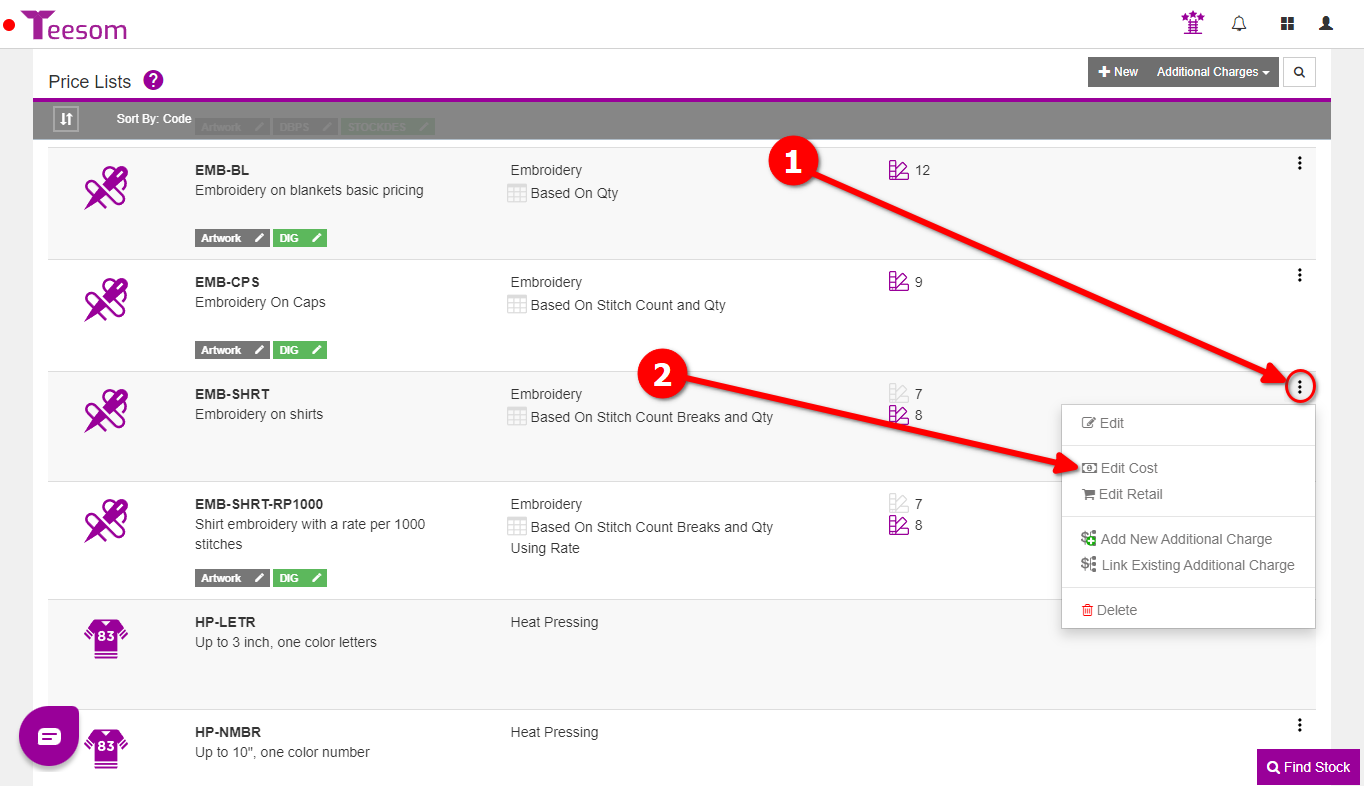
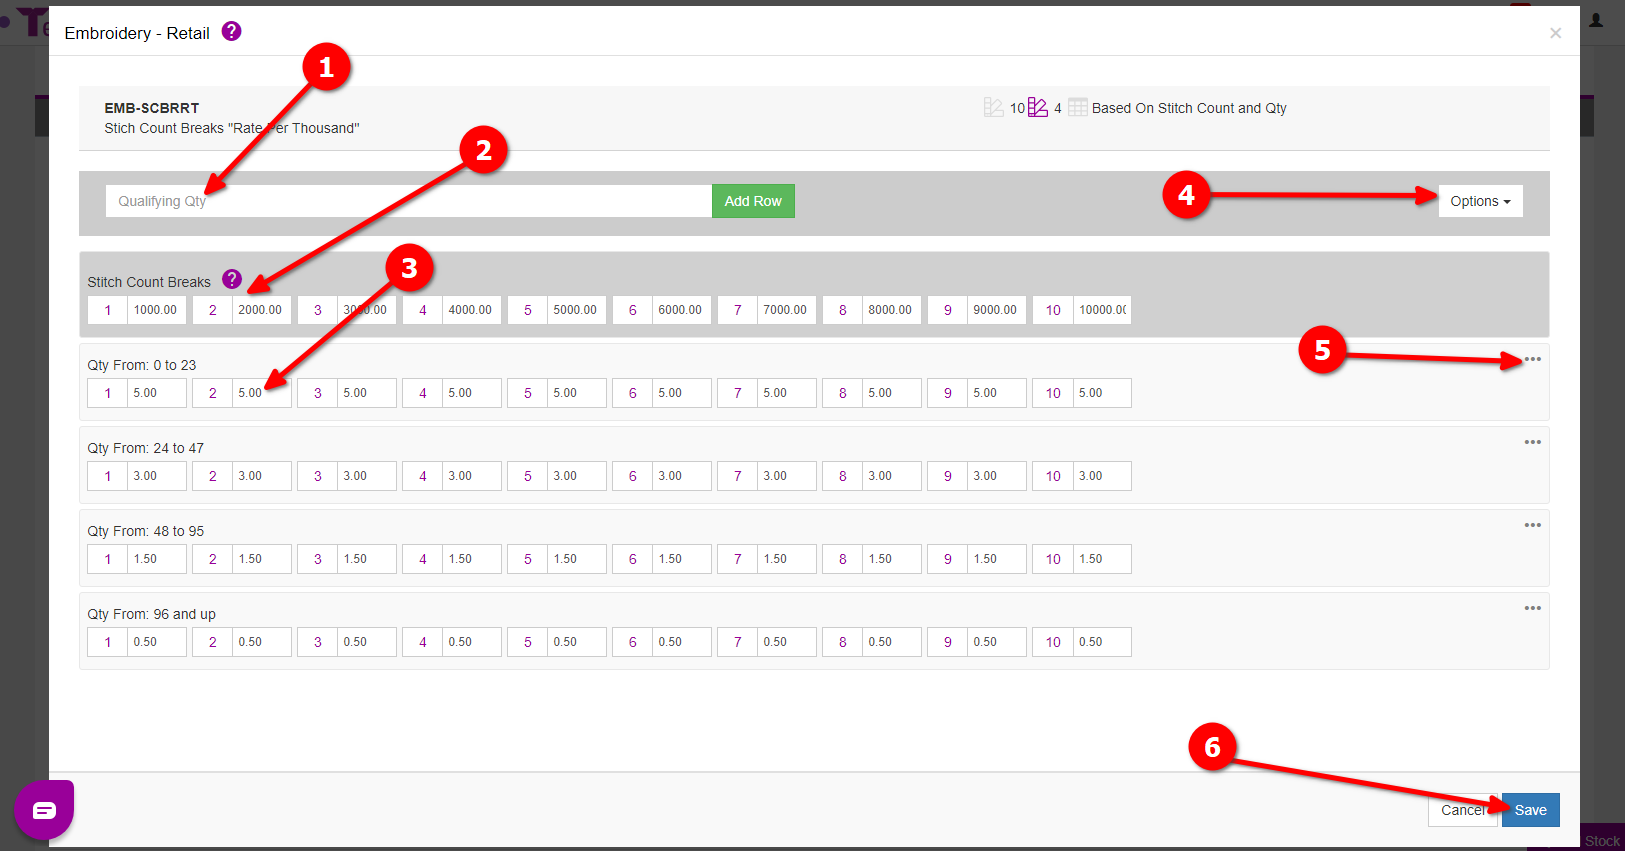
To create the cost table:
Click on the “3 Dot” menu and select “Edit Cost“:
Enter the quantity then click on “Add Row“.
Repeat for as many Qty breaks as you need.
Enter your various stitch count breaks.
Enter the cost amount for each stitch-count break & quantity break.
From the “Options” dropdown you can copy a price table from another pricelist. You can also import a csv or export it as a csv.
From the three dots you are able to change the QTY, delete the row, copy the row and re-calculate it to quickly add new rows.
Click “Save” to create the table.
Note: If the Rate per thousand option is checked, all header columns will have a rate per thousand. If the Rate per thousand is unchecked, an additional column will appear with the "∞" symbol. This is for stitch counts that go over your final header stitch count.
Create A Retail Price matrix
A retail price matrix is used when you don’t outsource your imprints and do them in-store.
A “stitch-count” retail matrix uses stitch count breaks along with set quantity breaks.
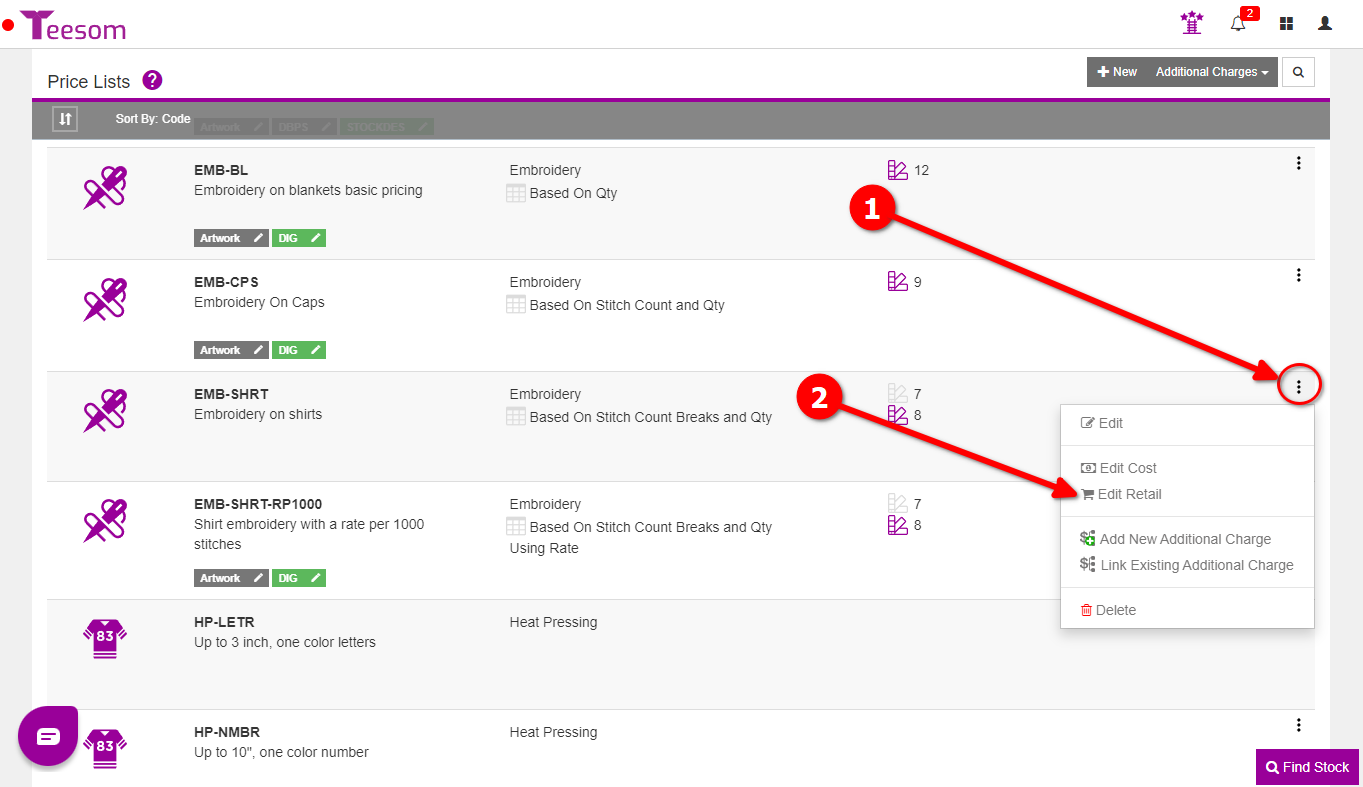
To create the retail price table:
Enter the quantity then click on “Add Row”.
Repeat for as many Qty breaks as you need.
Enter your various stitch count breaks.
Enter the cost amount for each stitch-count break & quantity break.
From the “Options” dropdown you can copy a price table from another pricelist. You can also import a csv or export it as a csv.
From the three dots you are able to change the QTY, delete the row, copy the row and re-calculate it to quickly add new rows.
Click “Save” to create the table.
Note: If the Rate per thousand option is checked, all header columns will have a rate per thousand. If the Rate per thousand is unchecked, an additional column will appear with the "∞" symbol. This is for stitch counts that go over your final header stitch count.
Example
The way the price matrix works is every header’s stitch count is the maximum amount for that header, for example:
If header 1 is set to 1000 stitches that is for every stitch count from 0-1000, if you go over 1000 stitches Teesom will use header 2 which would represent 1001-2000, and header 3 would represent 2001-3000 etc.
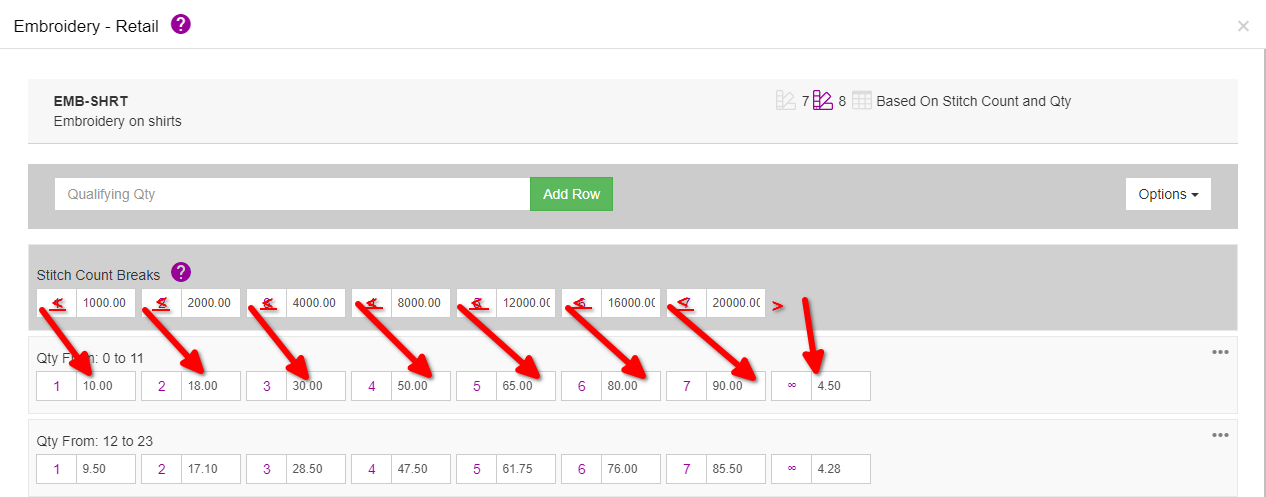
Flat Rate
In the example below: Within the first quantity break.
1000 Stitches or less will be charged at $10.
From 1001 to 2000 stitches the charge will be $18.
From 2001 to 4000 stitches the charge will be $30.
From 4001 to 8000 stitches the charge will be $50, etc...
If the stitch-count is above 20000, Teesom will calculate the total charge at a rate of $4.50 per thousand stitches (or part thereof.)
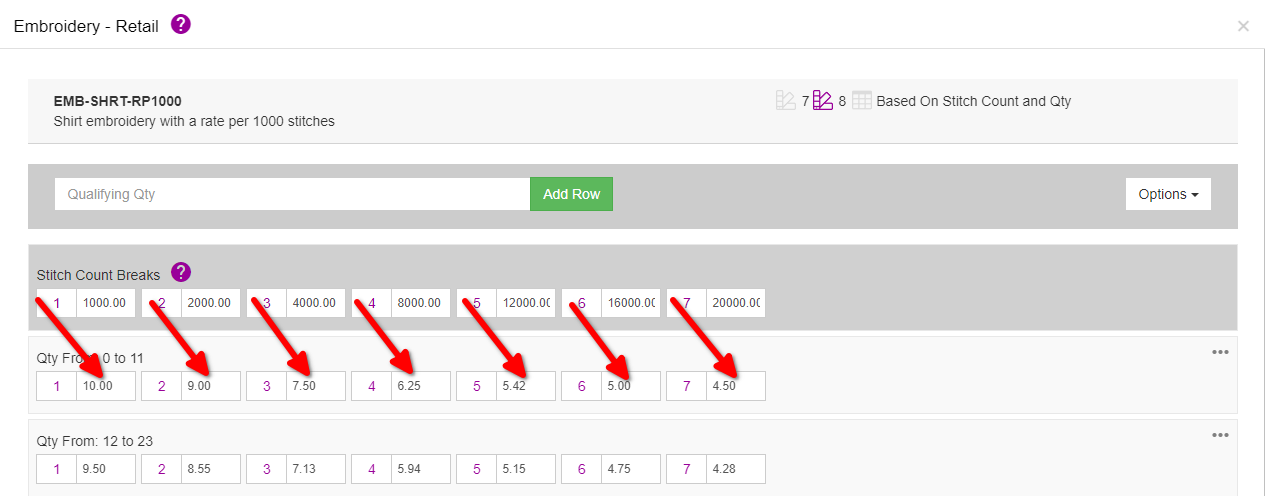
Rate Per 1000
In the example below: Within the first quantity break.
1000 Stitches will be charged at $10 per 1000 stiches. (An effective rate of 1 cent per stitch.)
From 1001 to 2000 stitches the charge will be $9 per 1000 stitches. (1500 stitches would cost $13.50)
From 2001 to 4000 stitches the charge will be $7.50 per 1000 stitches. (3200 stitches would cost $24)
From 4001 to 8000 stitches the charge will be $6.25 per 1000 stitches, etc...
With rate per thousand enabled you can see that the pricing is very dyanmic.
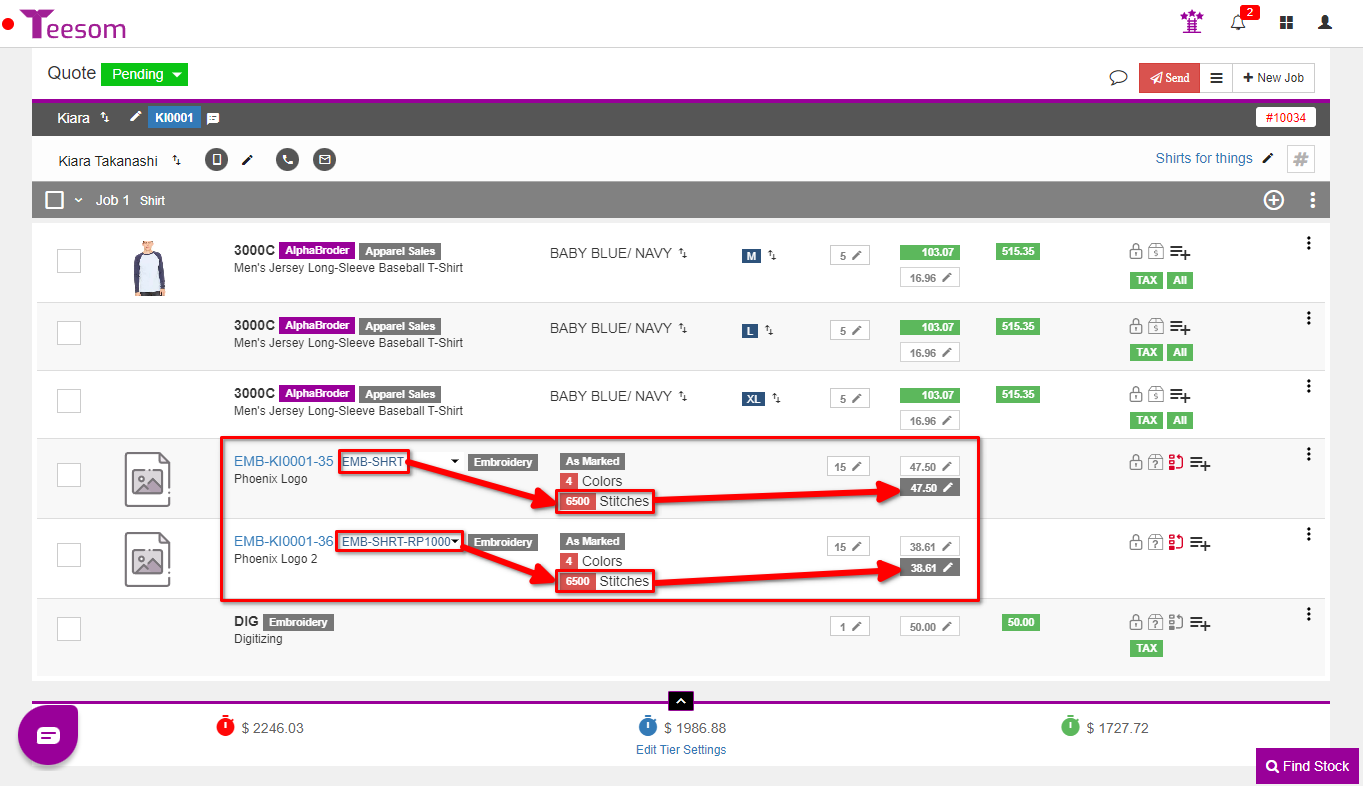
Order Comparison
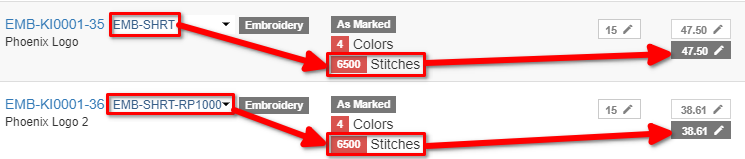
In the image below you will see an example of the two different pricing tables in action. EMB-SHRT-RP1000 has “rate per thousand” checked, and EMB-SHRT does not. The total imprints are both tied to the product quantity of 15, meaning both price matrices will be using the 2nd quantity break.
Although both imprints have the same stitch count their pricing is different. This is because the first price matrix, EMB-SHRT, uses flat rates at set stitch count breaks.
Whereas the second price matrix, EMB-SHRT-RP1000, uses a rate per thousand stitches at every stitch count break. This provides your customers with extremely dynamic pricing options.