First navigate to the company settings/setup page:
Go to the “Email” tab.
Expand the “Email Accounts” section.
Click “New Email Account”.
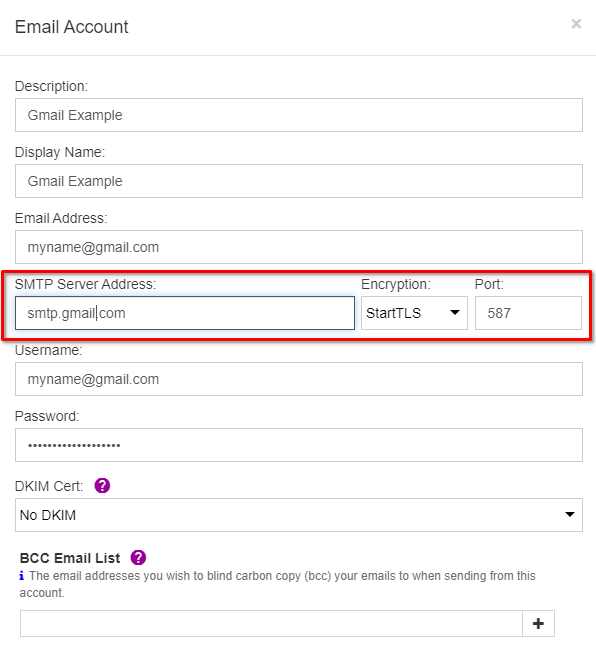
Gmail SMTP Settings Example
NOTE:You will not use your normal email/account password in Teesom. You will create a special "App Password" just for Teesom and use that instead (see below):
Use an “App Password” with Gmail
Important: Remember to make sure that you are actually logged into Gmail with the same account that you are setting up in Teesom! (You don’t have to stay logged in with that account, it’s just while you’re setting it up to ensure that we are adjusting the settings for the correct account.)
Since Google no longer allows using the ‘Less Secure Apps’ method (as they call it), you now have to enable ‘2-Step Verification’ in your Gmail account, so that you can create a special “App Password” just for Teesom. Here’s how:
First, enable 2-Step Verification in your Google Account by following the steps outlined here.
Under “How you sign in to Google,” click on the Arrow next to “2 Step Verification”.
Scroll down and then click on the arrow next to App Passwords.
If you don’t see “App Passwords”:
2-Step Verification is not set up for your account.
2-Step Verification is only set up for security keys.
Your account is through work, school, or another organization.
You turned on Advanced Protection.
If you don't see the "App Passwords" option, it may be because 2-Step Verification is not enabled, or because your organisation admin has not allowed 2-Step Verification as an option for your mailbox.
The App Password is the 16-character code in the yellow bar on your device. Select that 16 character code and copy it to your clipboard:
Now you can go to the email account settings in Teesom and paste this new App Password (the 16-character code) instead of your normal Google account password (all the other settings will remain the same.)