This is the primary system used in the United States. The tax percentage is set for the whole order, and then each row on the order is set to either ‘Taxable’ or ‘Non-taxable’. Teesom uses this by default.
Sales Tax Per Line On Order
The order itself is either set to ‘Taxable’ or ‘Non-taxable’, and then each row is individually taxed a certain percentage. In other words: each row on the order could be taxed at a different rate.
This article describes the FIRST option: "Sales Tax On Order"
To instead follow the tutorial on "Sales Tax Per Line On Order", CLICK HERE
The "default" tax system in the U.S is 'Sales Tax On Order'
Do not change the default tax system unless you have a very good reason for doing so, i.e: it is required for you to do so per the regulations and laws in your country or state. If you are unsure then please check with your accounting professional.
When you first signed up for Teesom it automatically created a tax code for you called “No TAX @ 0%”.
We will now create more from the “Company Setup” screen:
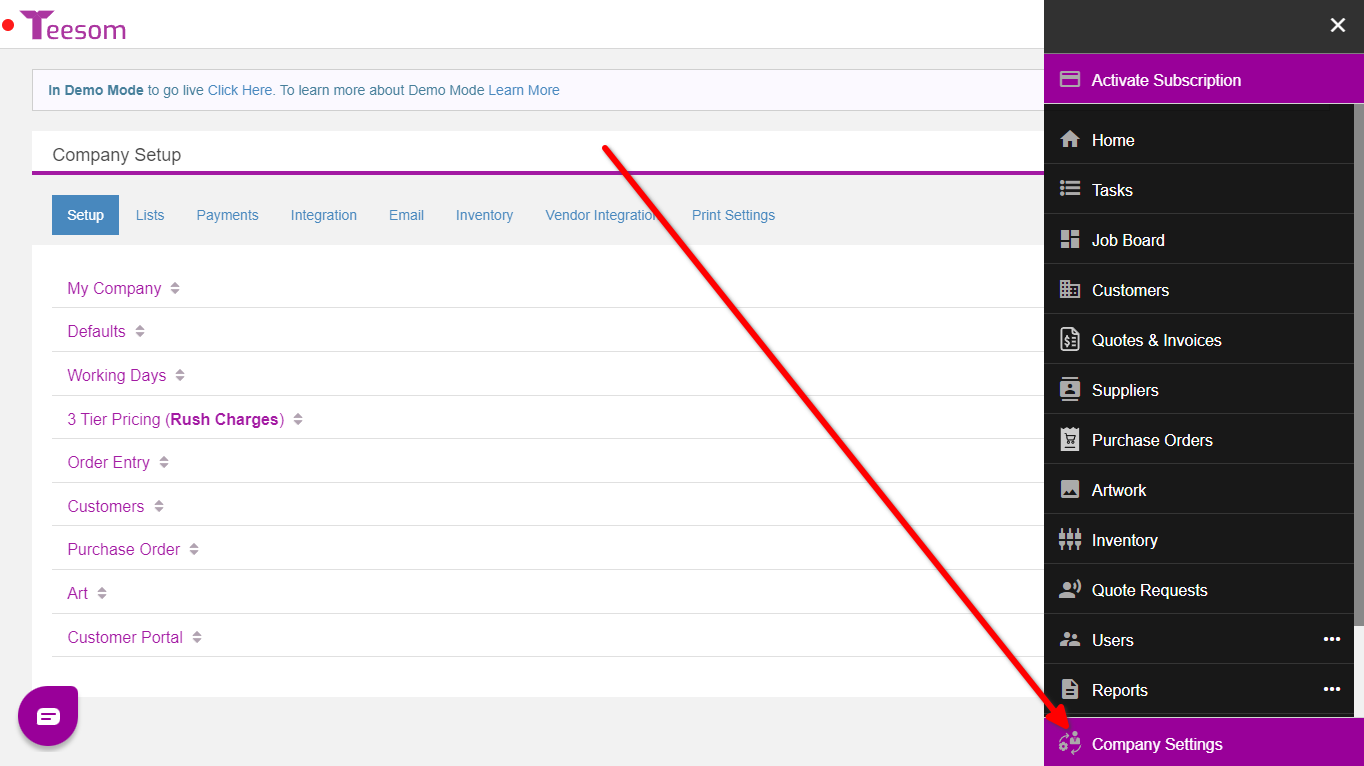
Go to the “Main Menu“.
Select “Company Settings“.
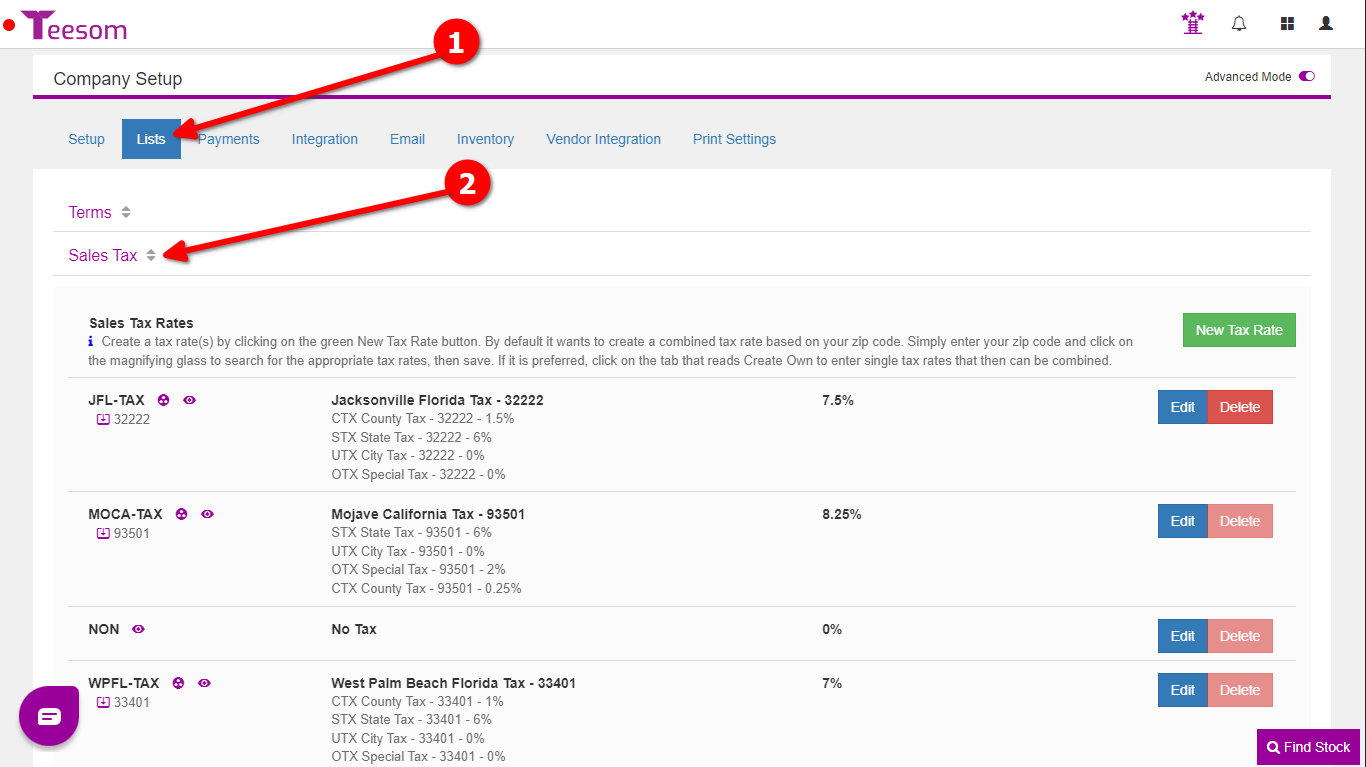
Then on the “Company Setup” screen:
Click on “Lists“.
Expand “Sales Tax“.
This is where you will view, edit and create your sales tax codes.
Important for QuickBooks Users: When setting up your Sales Tax Codes/Rates, they should be setup exactly as they are in QuickBooks!
i.e. If you have a combined tax that is broken out in QuickBooks you should do the same in Teesom, using the Zip Code should work in this case. If you have a single tax rate/code in QuickBooks then you should setup a single tax code in Teesom, you should create your own tax rate instead of using the "By Zip Code" function.
It is important that both your QuickBooks and Teesom tax rates match up and reflect how you pay your taxes in reality. Check with your accounting professional if you are unsure.
Here you can create your company’s tax codes.
Teesom has 2 ways of doing this:
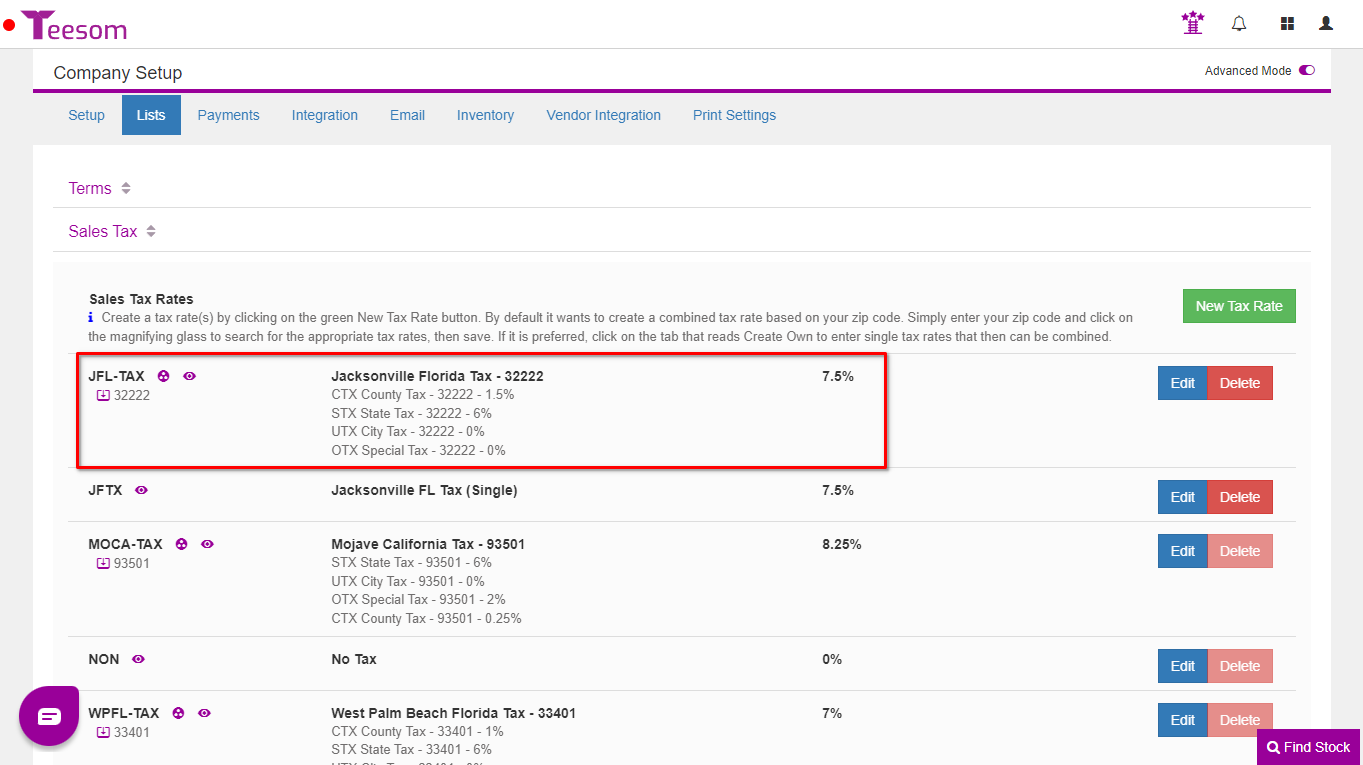
1. Automatically by ZIP code. (For QB users: Only use this if you want a Combined Tax Rate that is broken out by it’s combined tax components.)
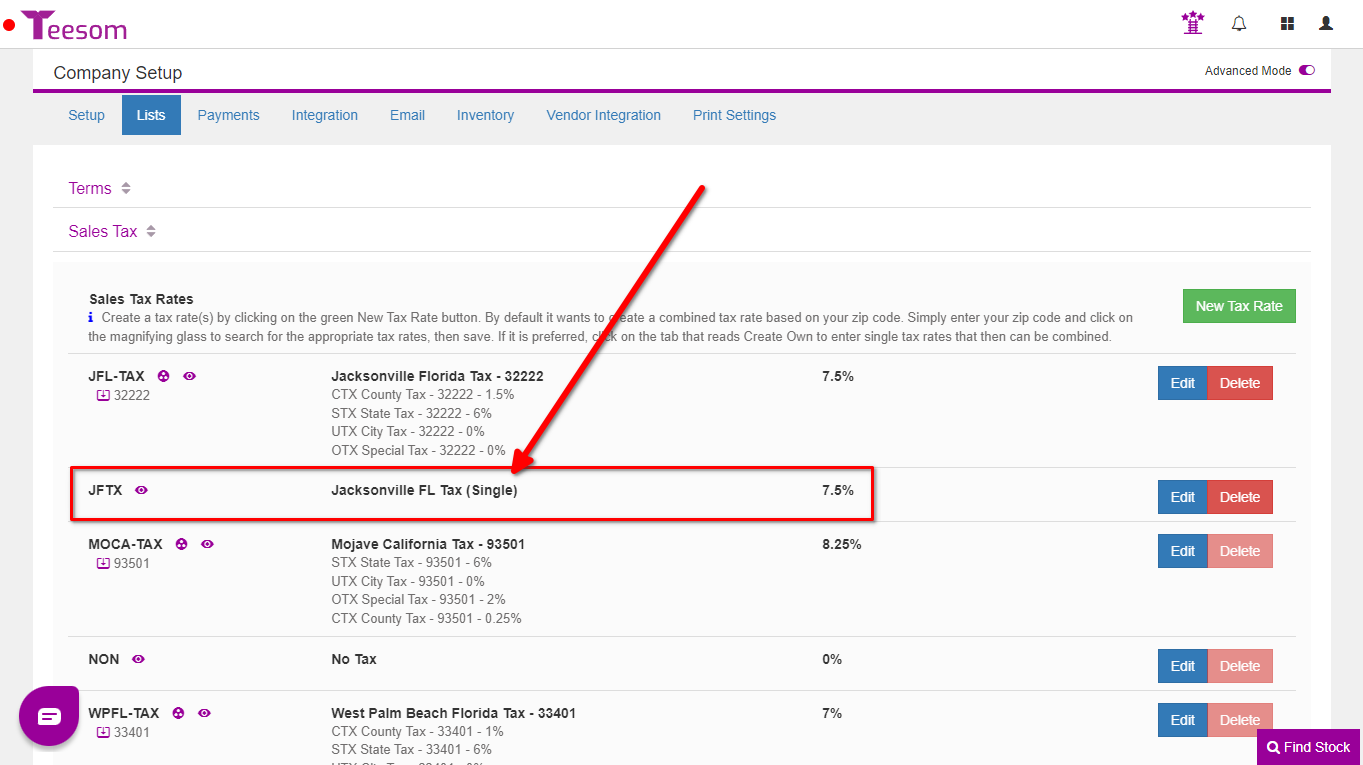
2. Manually, use this option if you just have a single tax rate in QuickBooks. (Which may be combined but is not broken out into components.)
Create Sales Tax Code Using A Zip code
Creating a tax rate by Zip Code will create a combined tax that is broken out. If that is not how it’s setup in your QuickBooks then create your own single combined tax rate instead.
Check out this quick video tutorial to see how to setup your tax codes By Zip Code:
To create a new “Sales TAX Code” by zip code:
Click on “New Tax Rate“
On the “New Sales TAX” screen:
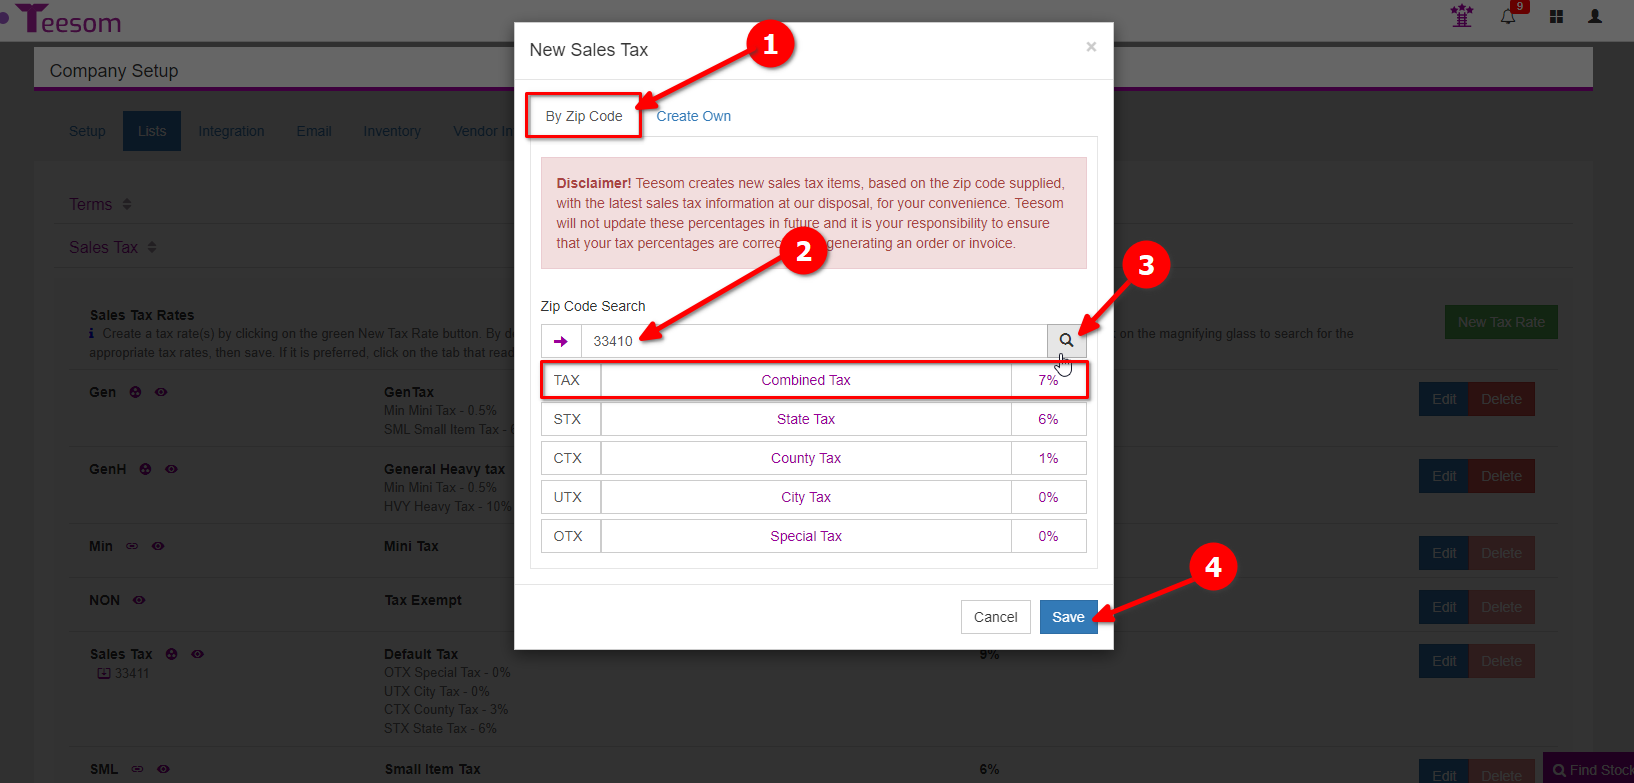
Click on the “By Zip Code” tab.
Enter the zip code you are creating the tax from.
Click on the magnifying glass to bring up a list of the tax codes that will be created.
Teesom will show you a list of all the tax codes that will be created for that ZIP code. Click Save to create them.
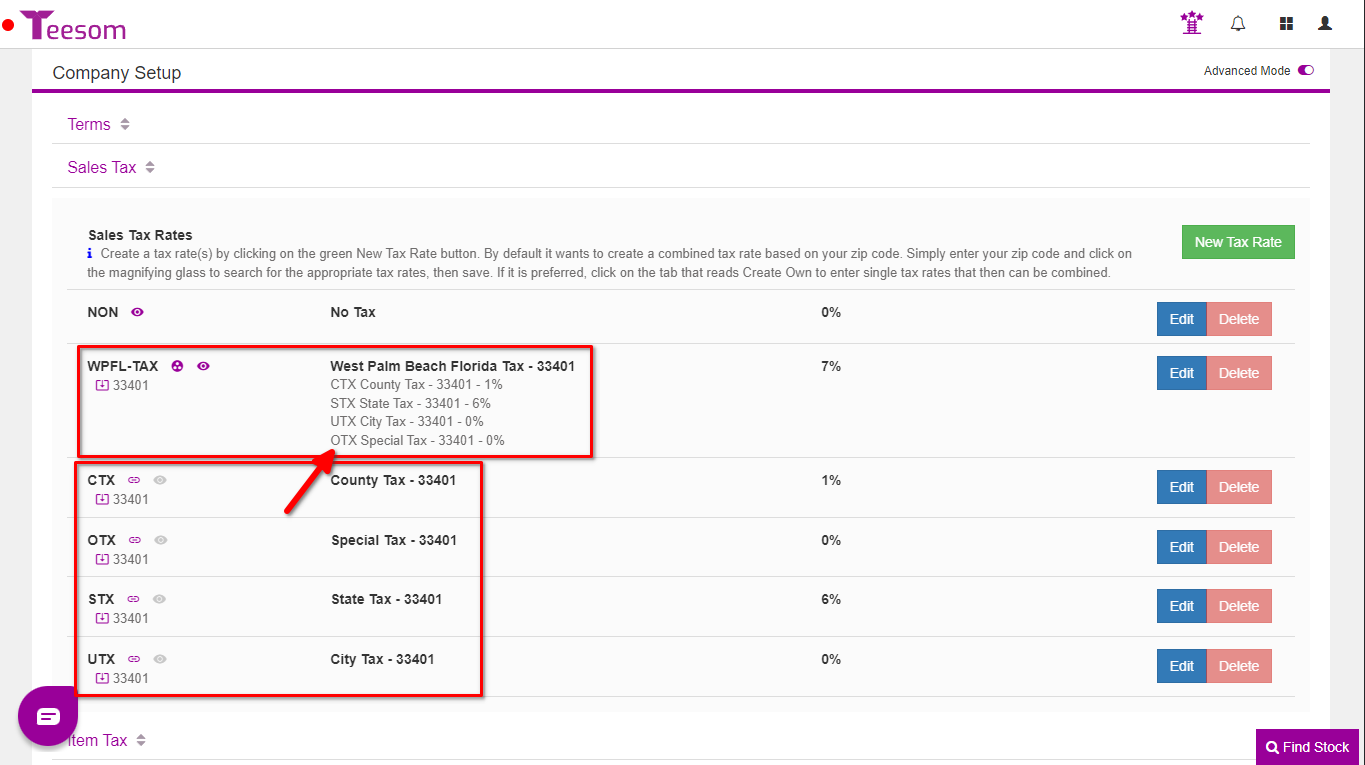
The Tax codes will be on the left, the description will be in the center, and the tax rates will be in the right column.
Note the row that says "Combined Tax". A "Combined Tax" is a tax code that contains multiple single tax codes. When you create tax codes using a zip code Teesom will automatically create a combined tax that will contain all the single tax codes that are created.
Create A Sales Tax Code Manually
If you are going to connect to QuickBooks, and you don’t have it broken out in QB, then just create a single code manually instead of using the By Zip Code.
To manually create a tax code:
Click on “New Tax Rate“
Create a Single Tax Code
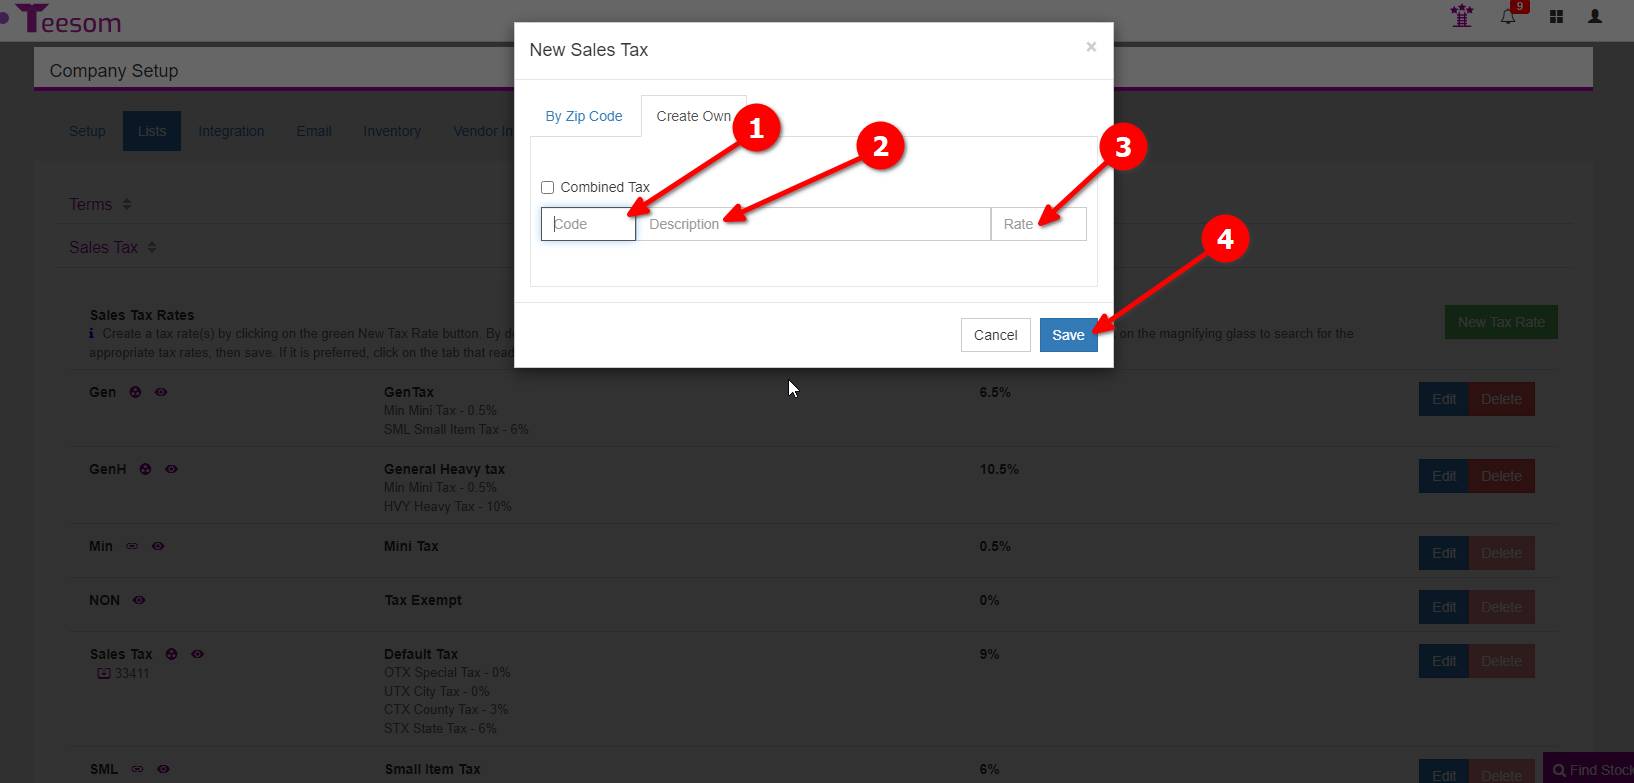
To create a single tax code:
Enter the tax code. (Abbreviated Description.)
Enter a description of your tax code.
Enter the rate. Ex: 5.5
Click “Save“.
Create A Combined Tax Rate
Before creating a combined tax you must first create all the single tax rate components that it will hold.
To create a combined tax code manually:
Click on “New Tax Rate“
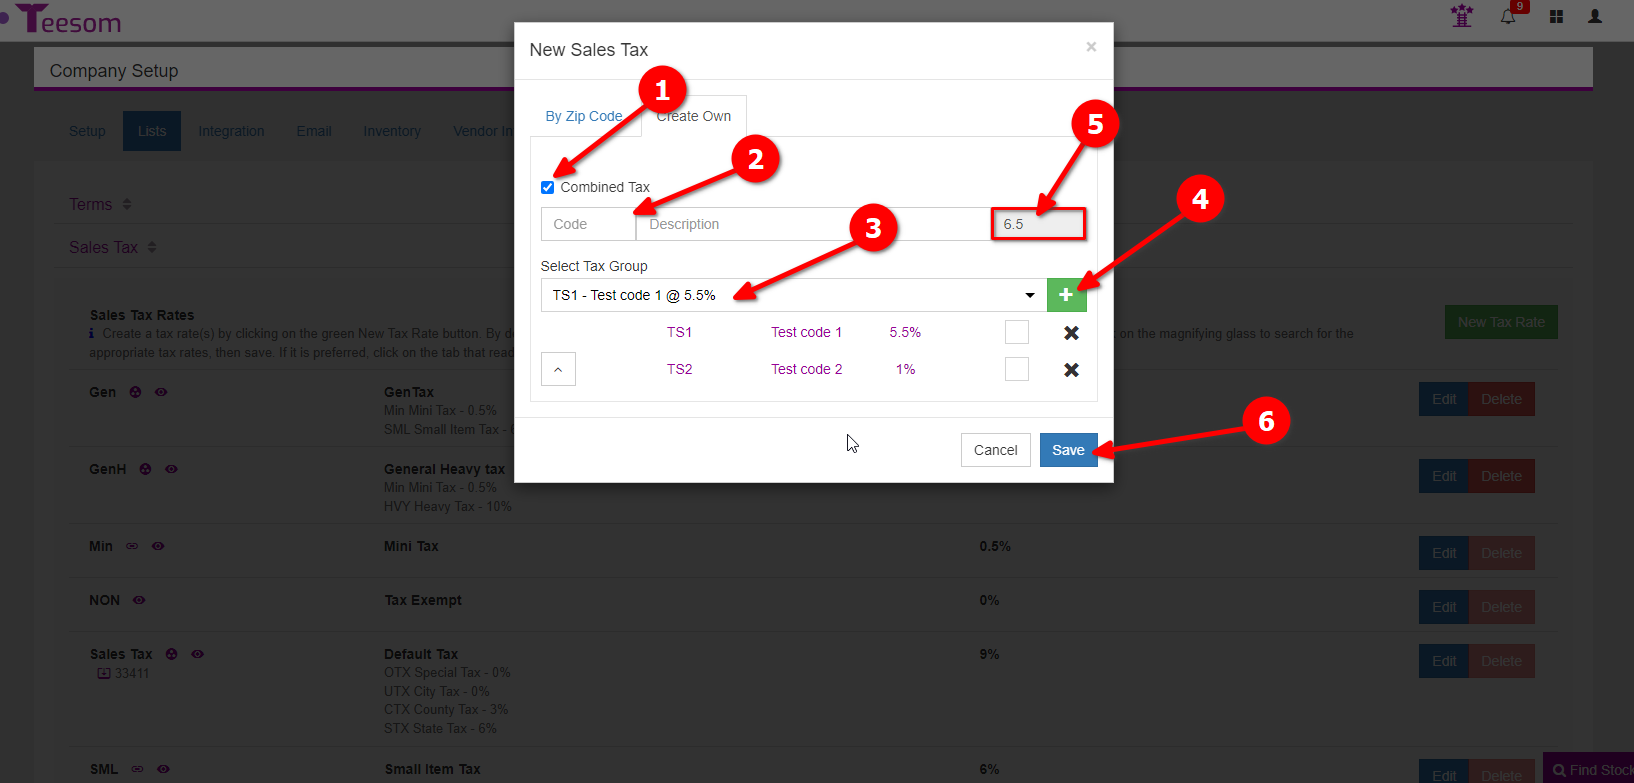
On the “New Sales Tax” screen:
Check the box “Combined Tax”.
Enter a tax code and description. (The Tax code must be unique when adding manually.)
Select which single tax code you want to add.
Click the green plus to add the single tax code. (Repeat steps 3 and 4 until you have all the tax codes you want in this combined tax group.)
After adding the tax codes you can see their combined rate.
Click on “Save” to create the combined tax.
You can only add/remove single tax codes when creating the combined tax.
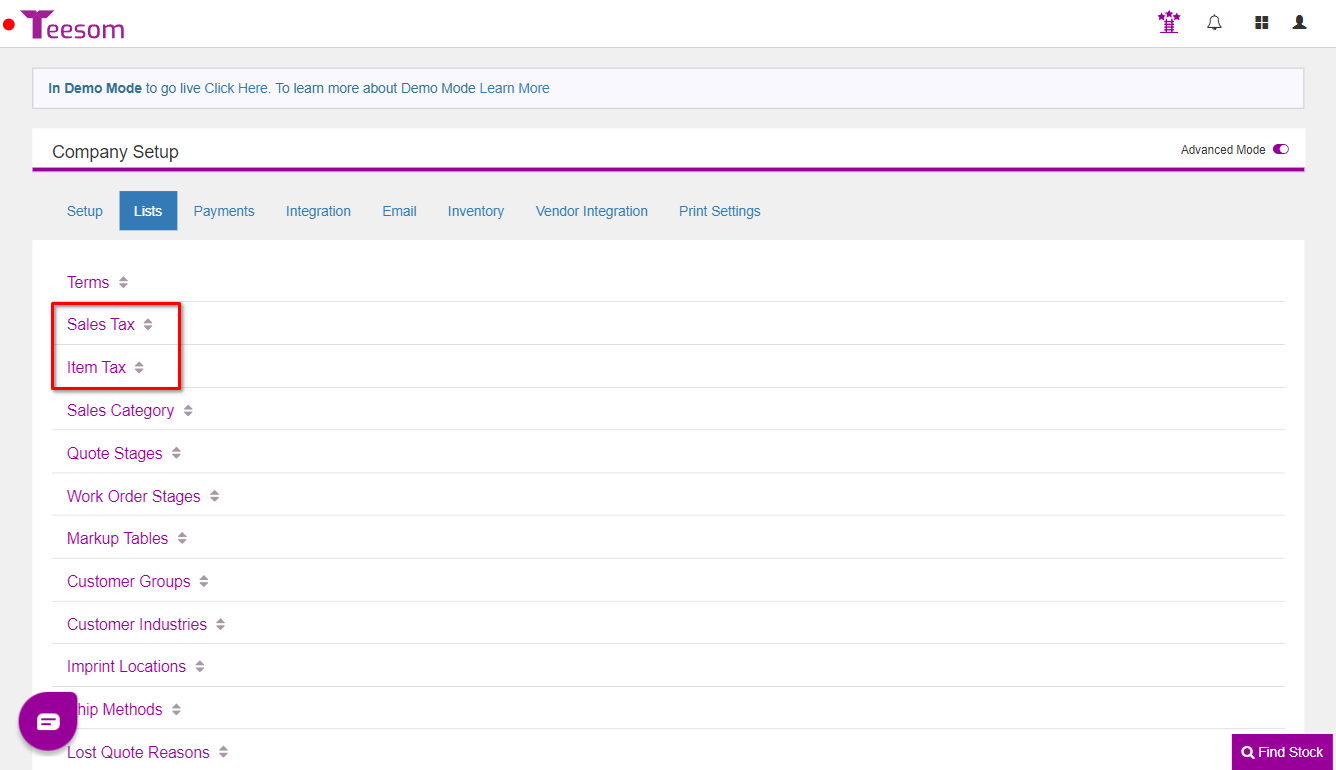
"Sales Tax" vs "Item Tax"
On the Company Setup page, under Lists, you will see two sections for tax; Sales Tax and Item Tax.
We’ll briefly illustrate the difference between the two by showing how they appear on an order in Teesom.
Sales Tax: Is set on the order itself and determines the tax rate for the whole order.
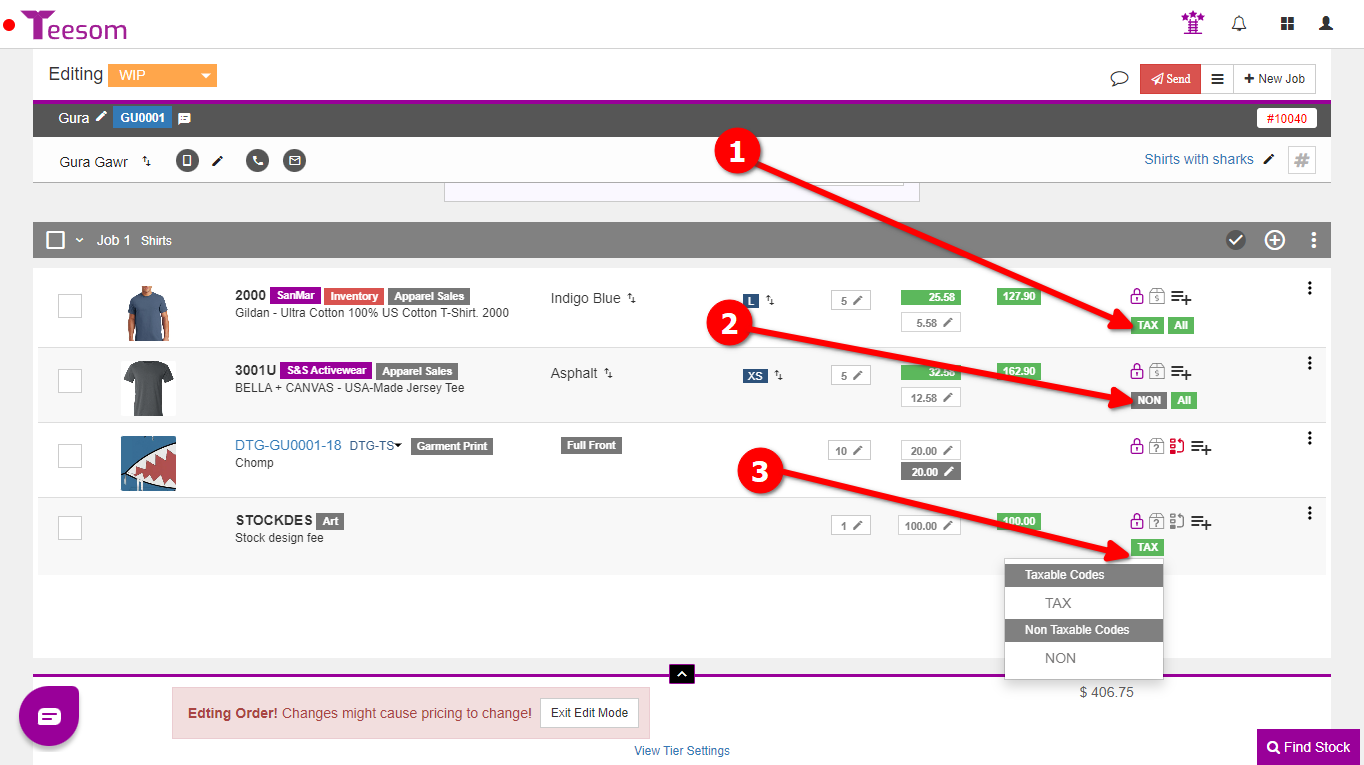
Item Tax: Is set on each individual item or service row on the the order and determines if that row will be taxable or not. (The Item Tax can only be either taxable or non-taxable.) Any items that are taxable will use the sales tax rate assigned to the whole order.
The first item row has a Green TAX box. This indicates it is a taxable item/row.
The 2nd row has a grey NON box. This indicates that the item/row is non-taxable.
Click on the green/grey box to edit this. (For WIP invoices you must be in edit mode.)
Note: If one line item is built-in to another line item, then it will use the item tax code of the item it is being built-in to.
Edit/Delete Sales Tax Codes
After creating your new sales tax codes you will be able to view and edit them. To do so click on the blue ‘Edit’ button of the relevant tax code.
Editing a single sales tax is different to editing a combined sales tax.
You will not be able to delete any tax code that is in use on an order.
Before deleting a "Single Tax Code", you will need to delete all combined taxes that use that tax code.
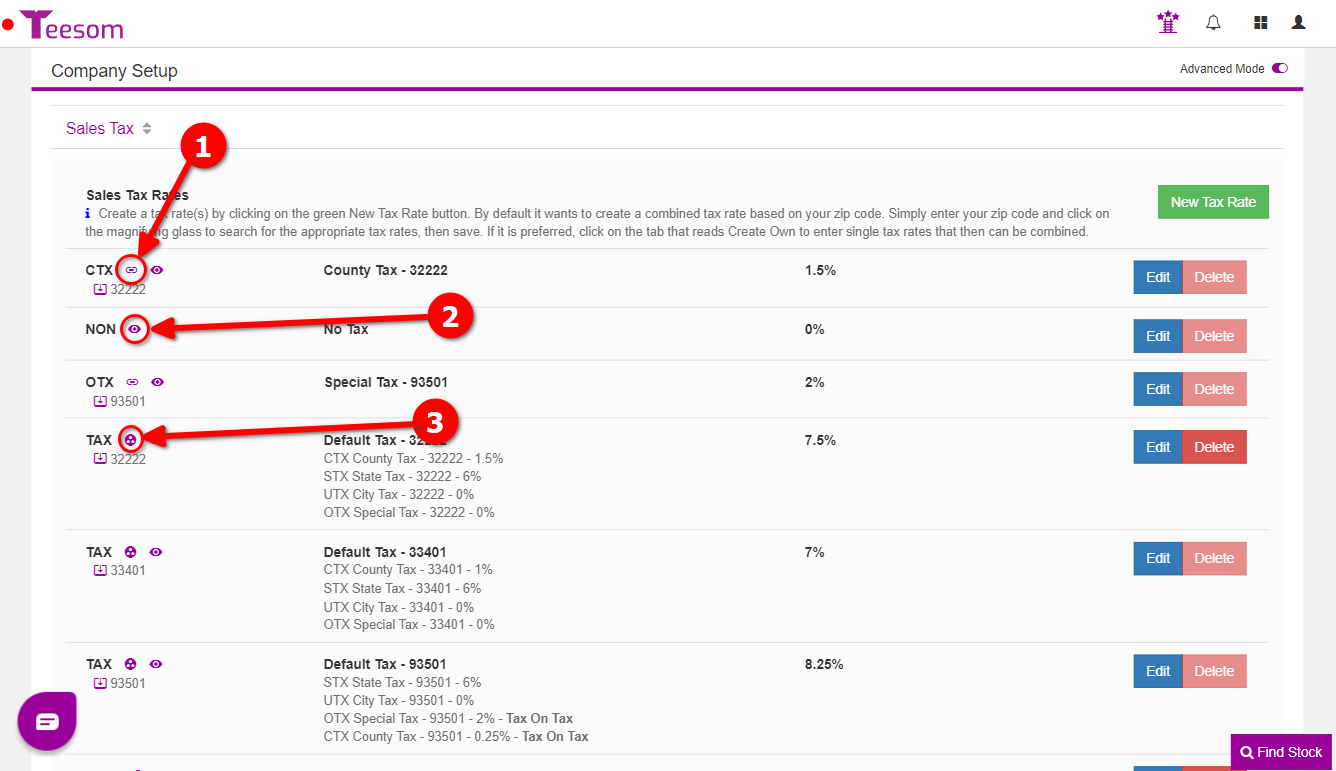
The link icon being purple indicates that this tax code is part of a combined tax.
The eye icon being purple means this tax code will be available to use on orders.
This icon is shown on combined tax codes/rates.
Hover over the icons for tooltip info.
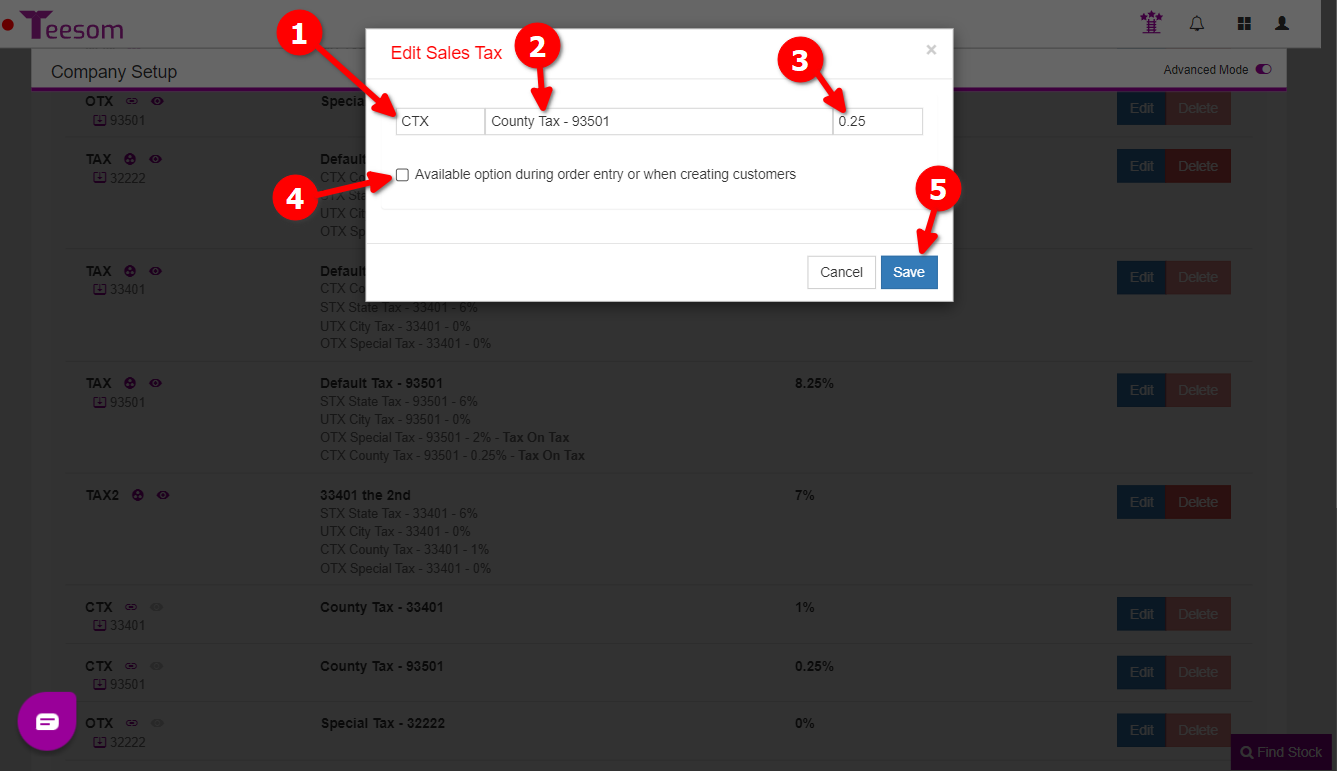
Edit A Single Sales Tax
Update the code for this sales tax.
Edit description.
Edit rate.
Check the box to make this single tax rate available to use on orders.
Save your changes.
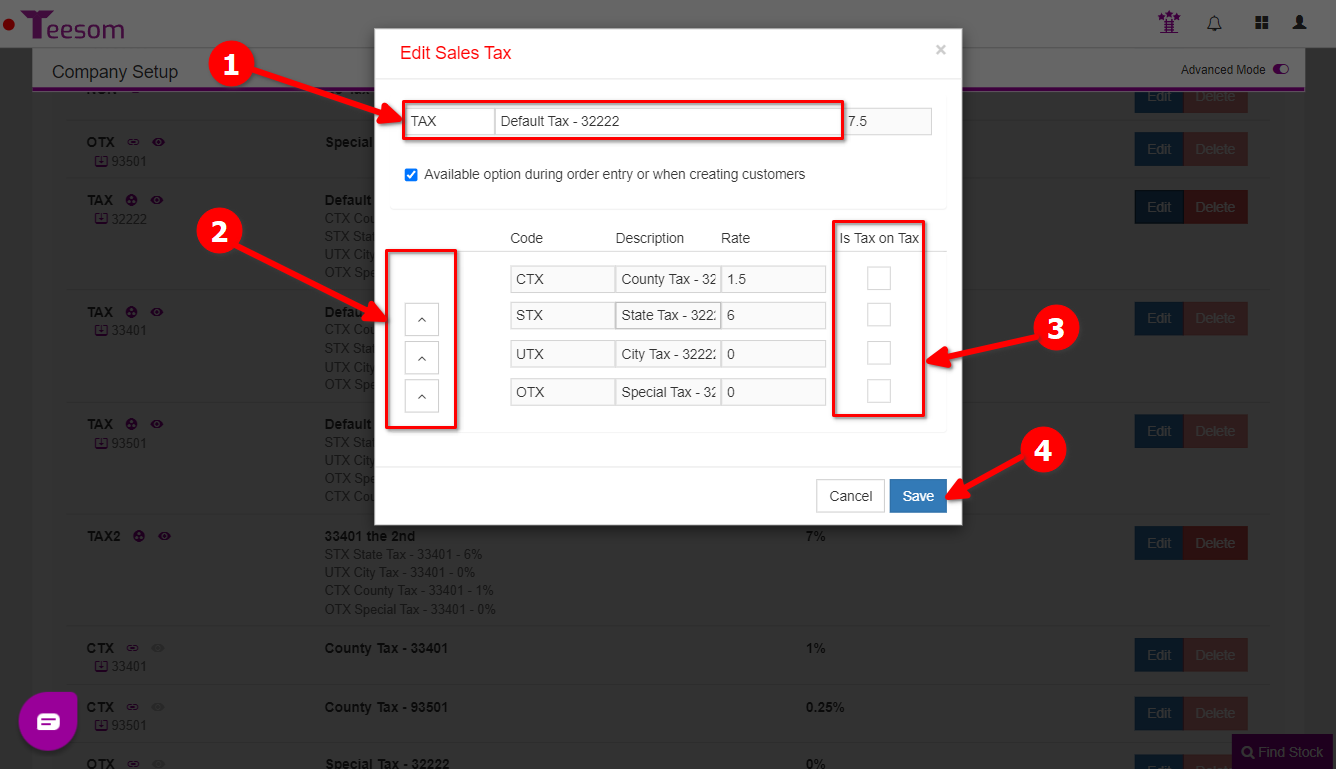
Edit A Combined Sales Tax
Edit the combined tax code and description.
Change the order that the tax codes in the combined tax appear in.
Toggle ‘Is Tax on Tax’ on or off.
Save your changes.
The combined rate is the sum of all the single rates. It can only be changed by editing the single tax codes associated with it.
You can only add/remove single tax codes when initially creating the combined tax.
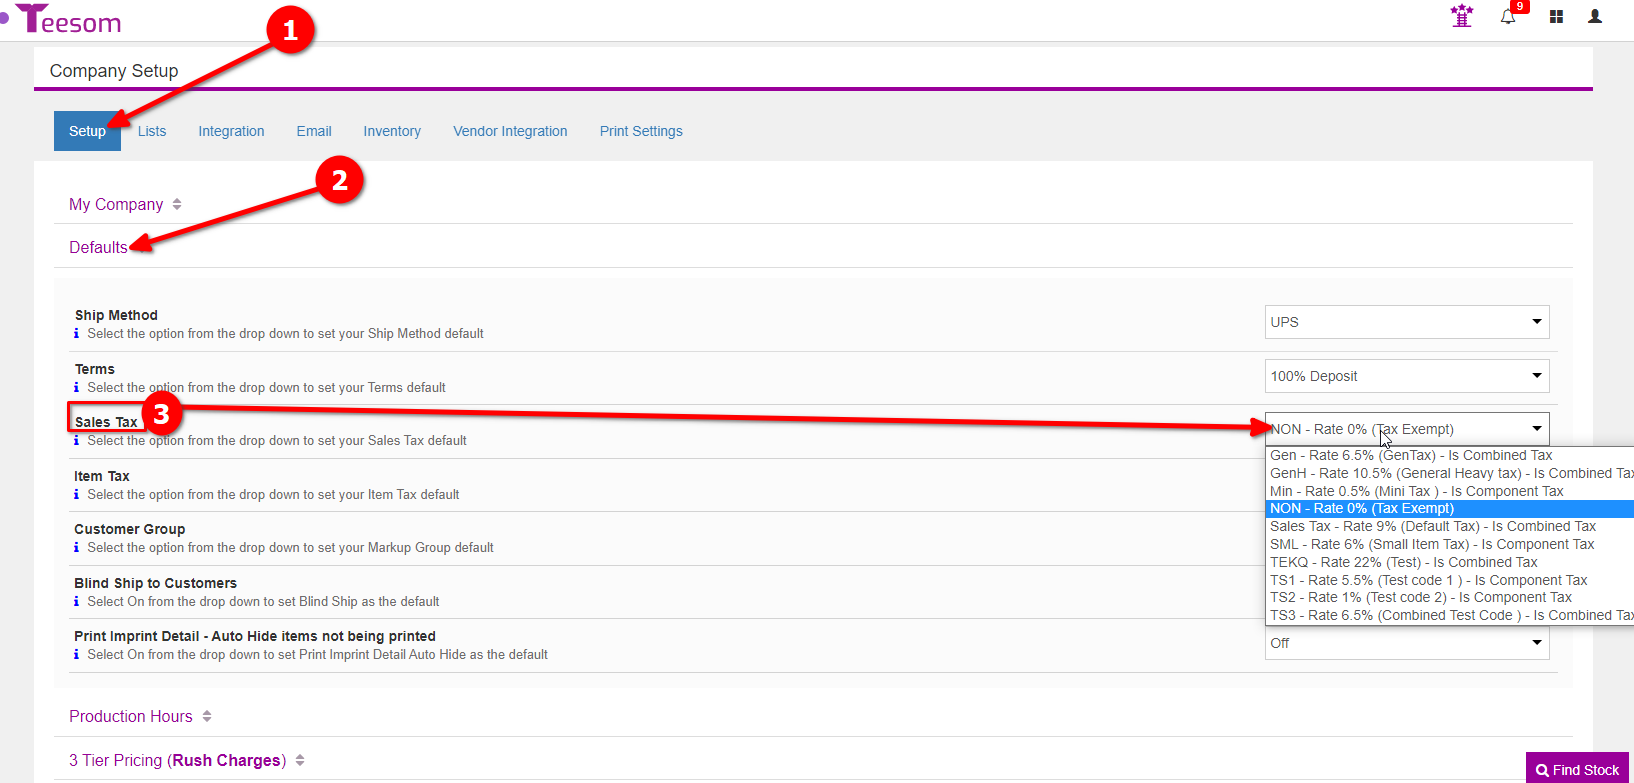
Set The Default Company Tax
You can set your company’s default sales tax from the “Setup” tab on the “Company Setup” screen:
Click on the “Setup” tab.
Expand “Defaults”.
Set your default sales tax by clicking on the dropdown and selecting a sales tax code.
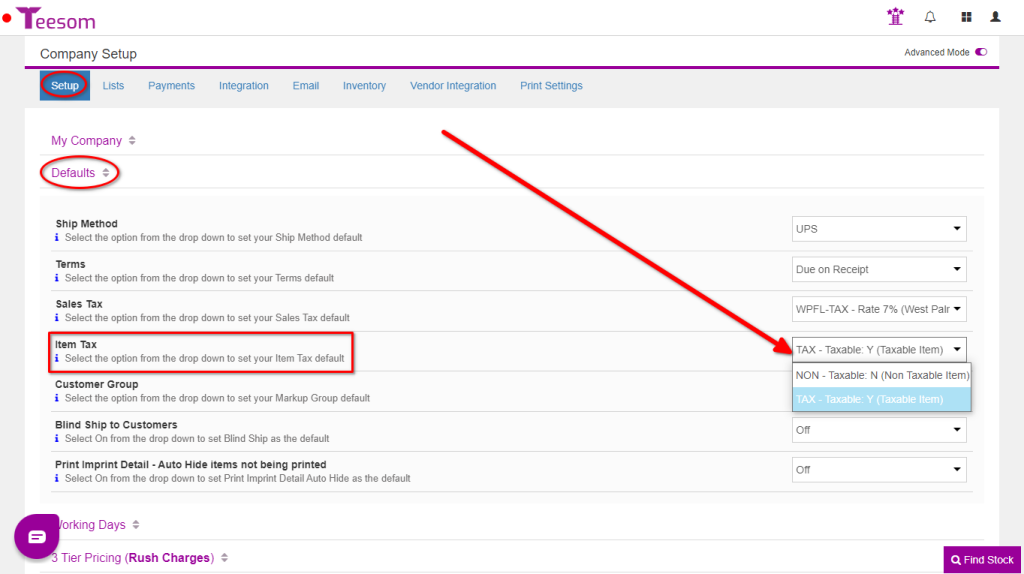
On the same spot, right below Sales Tax, you can set the default Item Tax. If the majority of your sales are taxable then set this to TAX. If the majority of your sales are NON-Taxable then select NON.
Set The Default Tax For A Customer
To set the sales tax for a specific customer:
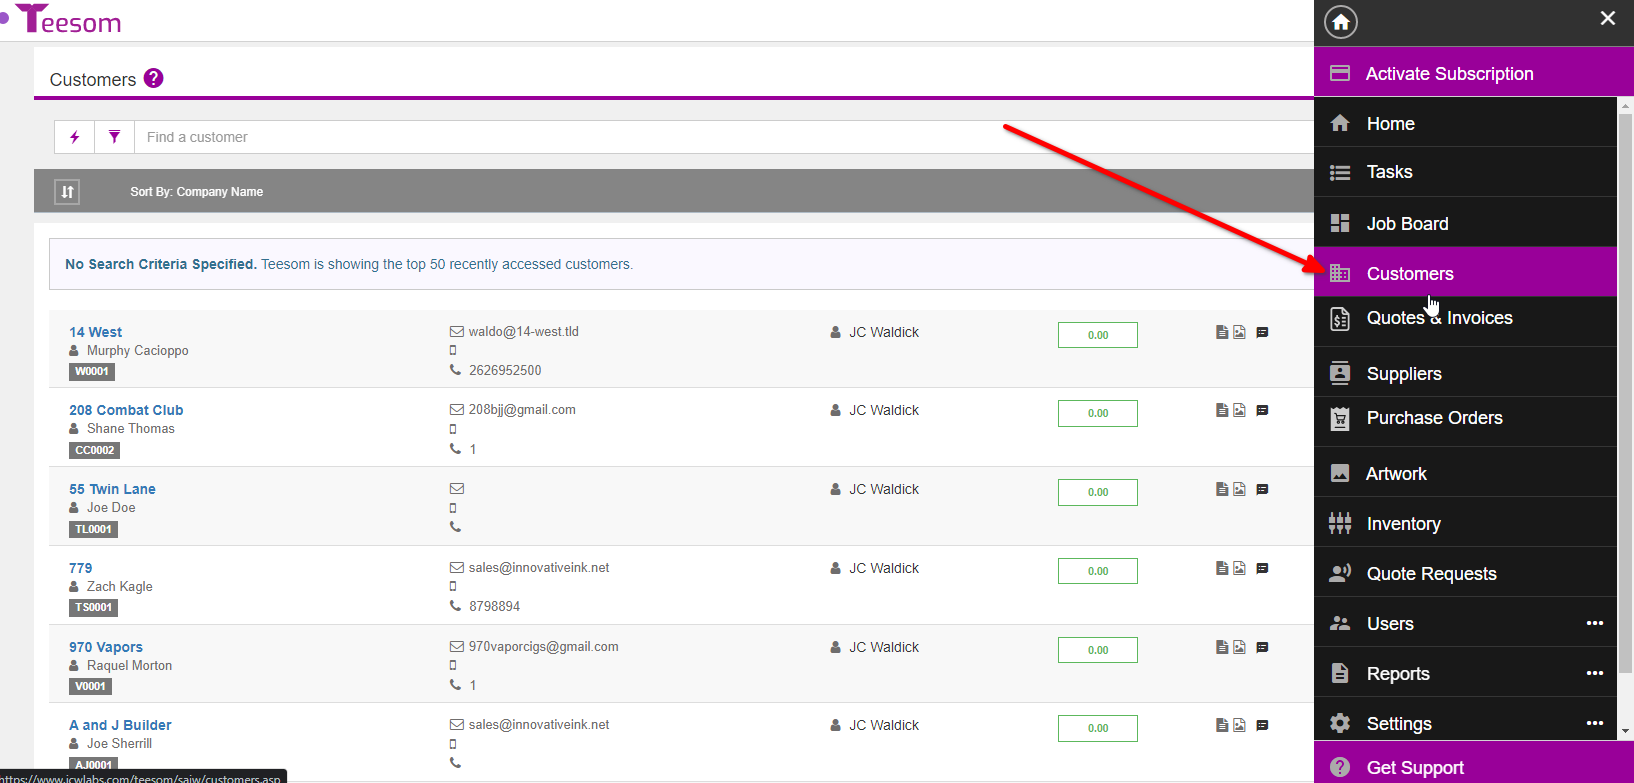
Go to the “Main Menu“
Select “Customers“
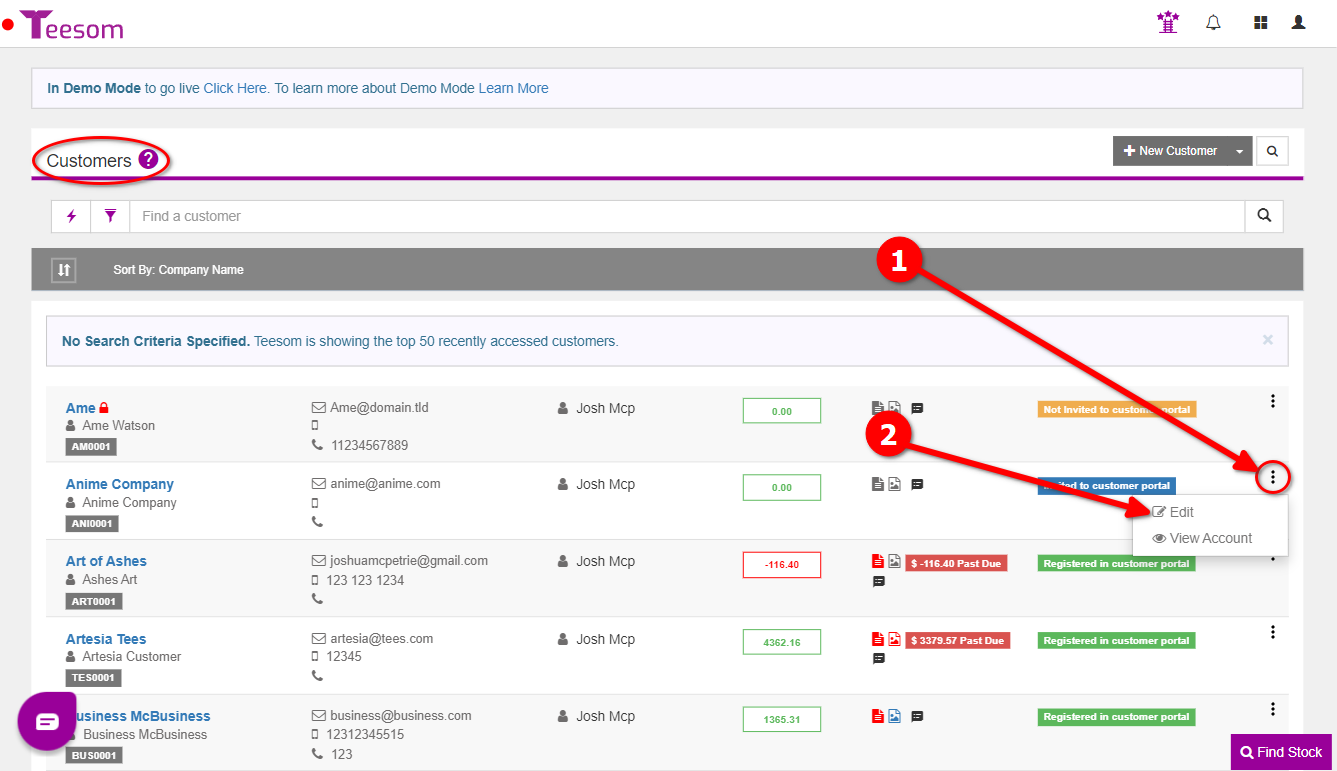
On the “Customers” screen:
Click on the “3 Dot” menu.
Select “Edit“.
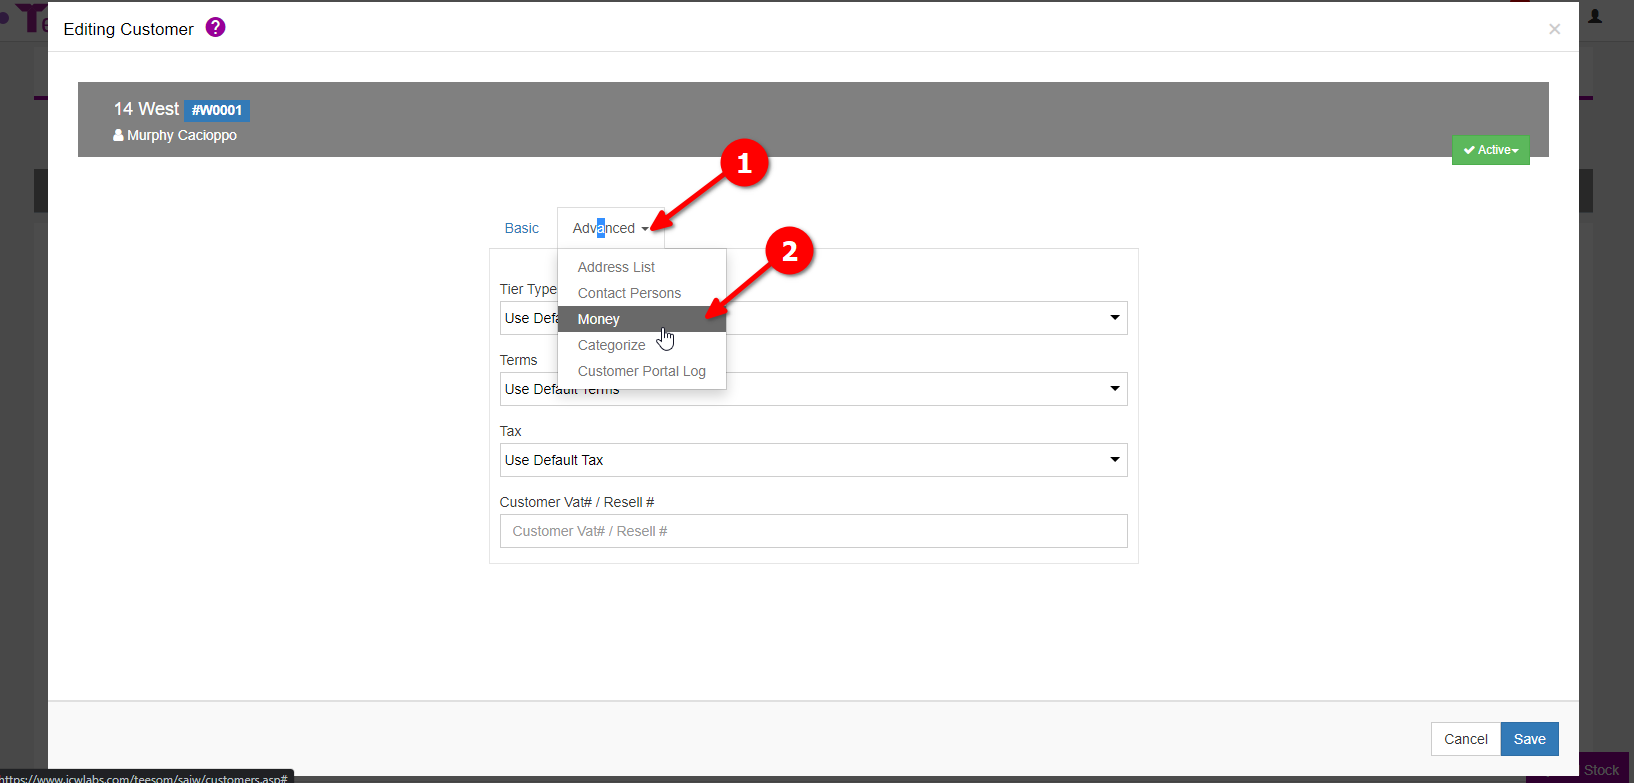
On the “Edit Customer” screen:
Click on the “Advanced” dropdown.
Select “Money“.
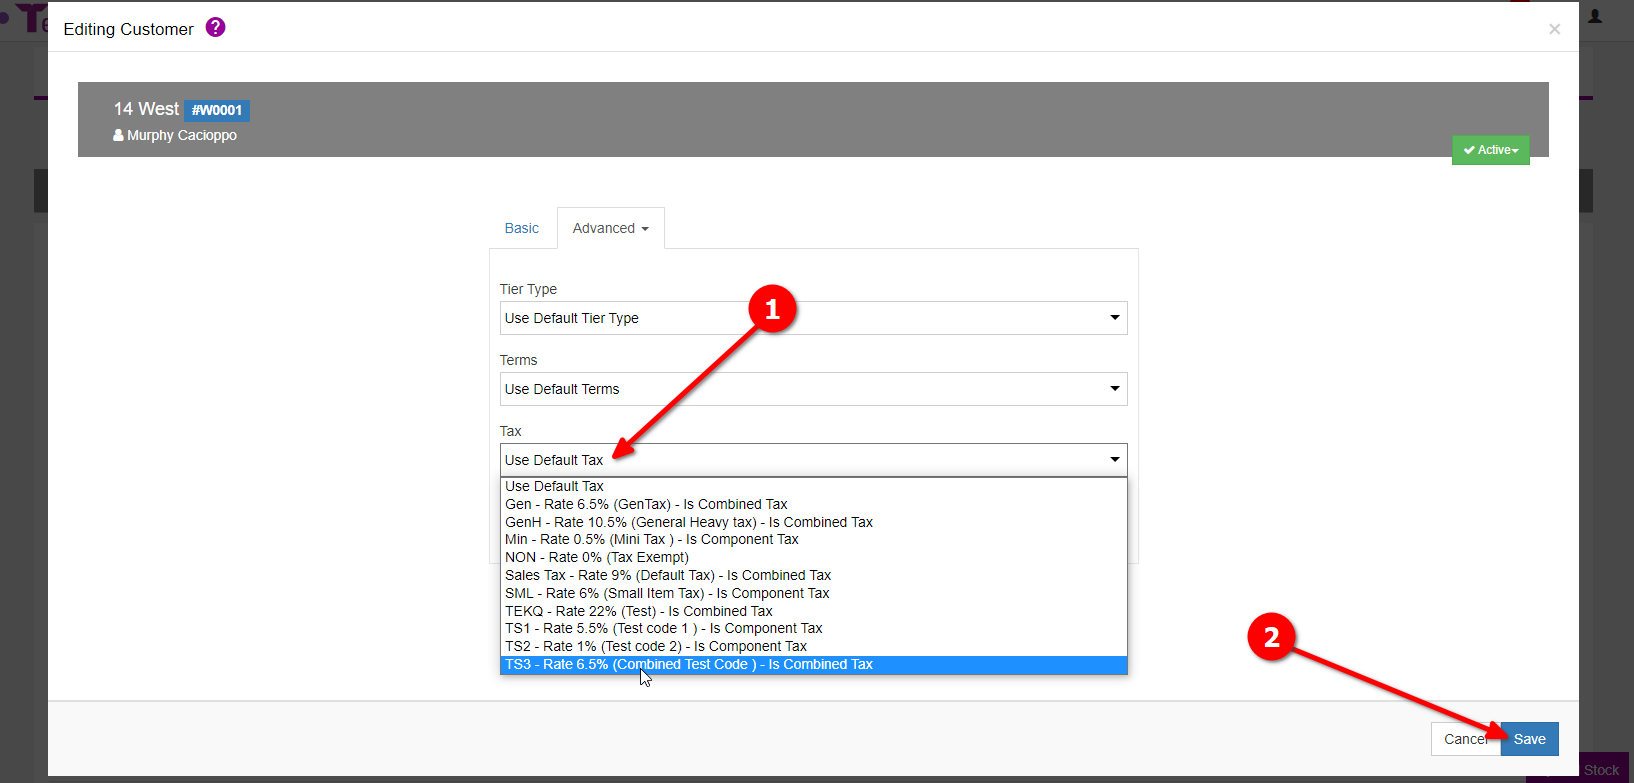
Select the sales tax code you want to be used with this customer.
Click “Save“
If "Use Default Tax" is selected then the customer will use the company default.
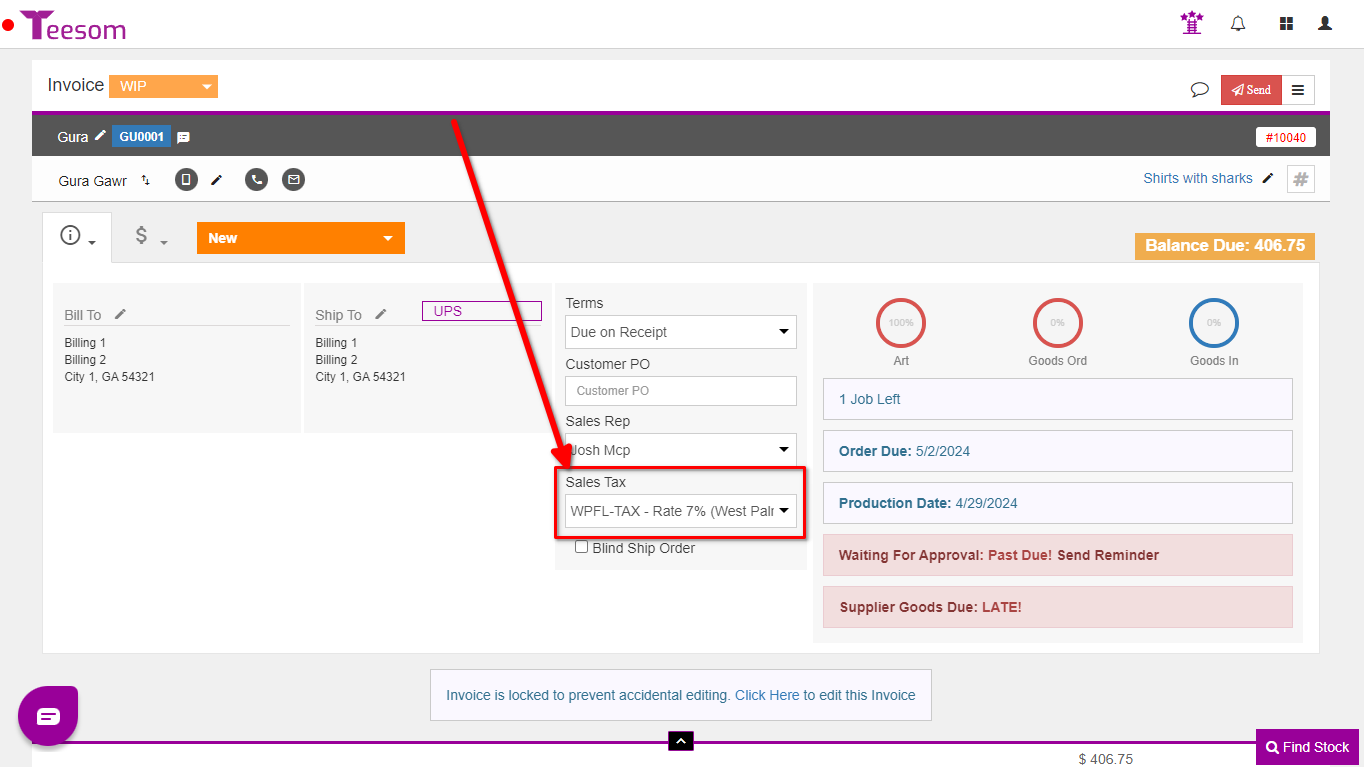
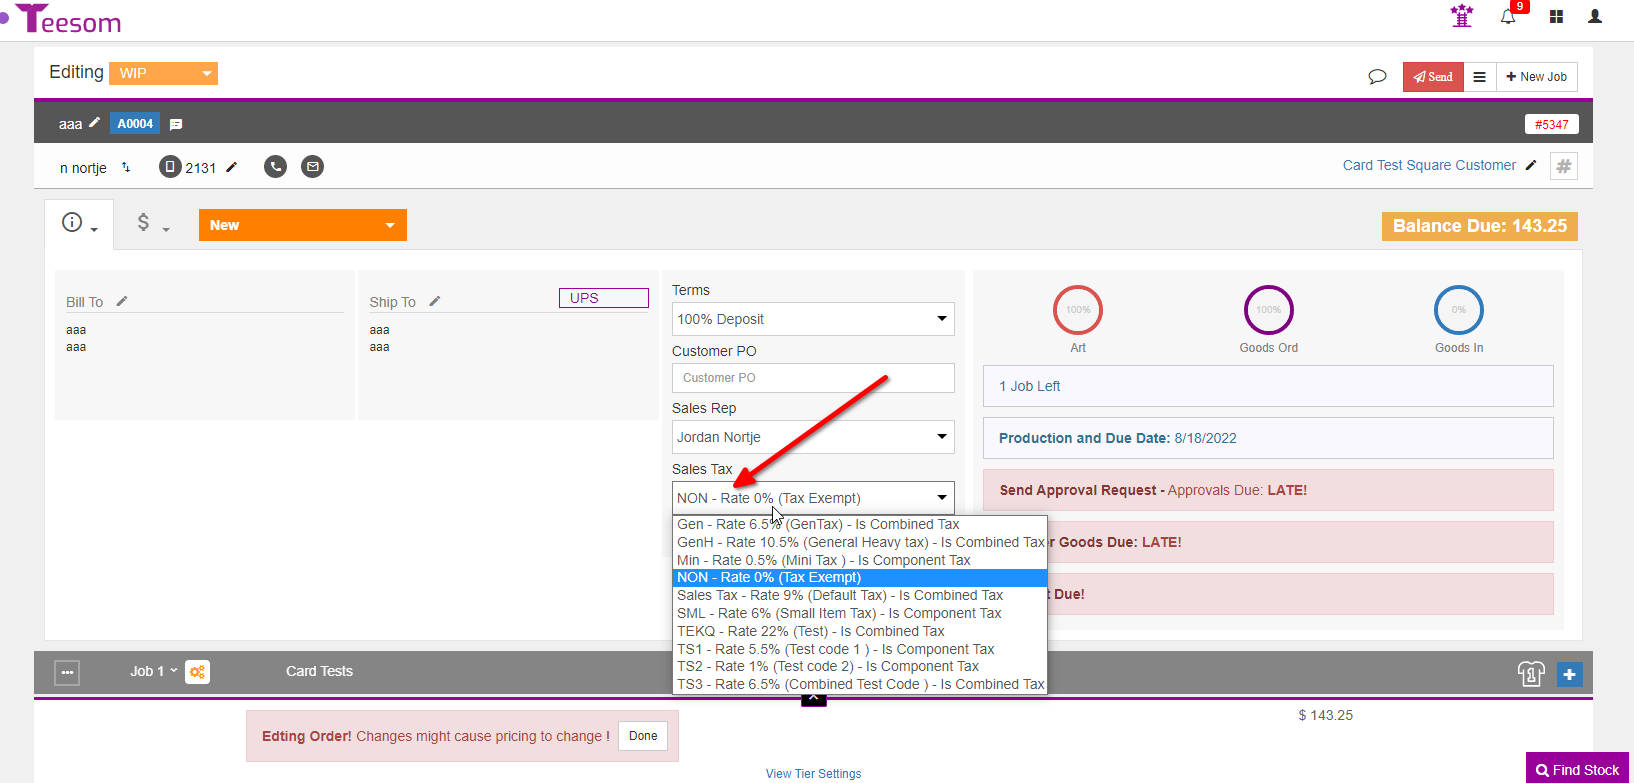
Set The Tax On An Order
To change the sales tax on an order:
Open the order.
Click on the “Sales Tax” dropdown and select the sales tax.
To change the "Sales Tax" on a WIP Invoice you must be in edit mode